Showing posts with label decor. Show all posts

Wednesday, July 17, 2013

DIY: Reversible Painted Throw Pillow

I have a slight obsession with throw pillows. I love them. I was thinking of a new pillow design for this "new to us" vintage chair and I couldn't decide between two ideas, so that gave me an idea to use one pattern for each side. 

Materials:

plain fabric (cut into two panels for the front and back)
black fabric paint
foam paint brush
sewing machine
matching thread

For the first side, I traced squares in different sizes to make a geometric pattern. I painted them in with the black fabric paint and set aside.


For the second side, I took the end of the foam brush and made little crosses with it. You can use a paint brush for a more uniform look...but I liked the random variety better.

 Once both panels are completely dry (read the paint bottle for instructions), place both panels together with right sides facing and pin. Sew along the outer edge with a straight stitch along three sides.

Flip the case right side out, put your pillow inside, and hand stitch the bottom closed.

Done! A perfect pillow for my indecisive mind;)

Friday, May 31, 2013

DIY: Painted Herringbone Memo Board

I found this cork board on a walk with my mom one day. It was out in front of a neighbor's house in their pile of things to be picked up by the city for removal. I am always amazed at the perfectly useful items that people put out for "trash". 

So, obviously I picked it up and carried it another block back to my car.


I had the idea of a painted memo board in my head for some time. I taped off the frame of this one and spray painted it black. Then, once I decided on a herringbone pattern, I drew it out with a black marker.

I started with vertical lines:


    Next, I used a ruler to make alternating diagonal lines. A herringbone pattern is similar to a chevron pattern. The only difference is alternating the colors between the lines. I colored in the lines that needed to be painted so that I wouldn't loose track while painting.


I used regular acrylic paint to paint in all the lines. I redecorated my daughter's art nook and it makes for a fun and new way to hang her artwork:


She's in a rainbow and heart phase...if you can't tell;)


 I also wanted to incorporate my latest vintage find. This basket makes for the perfect place to keep her coloring books and crayons both organized, and away from her little brother;)


I originally created this board to hang horizontal, but found that it fit the space better if hung vertically. Oh well, it was a fun and free project and I love the way it turned out...no matter which direction:)


Tuesday, December 11, 2012

DIY: Numbered Coasters

I had been wanting to make a set of numbered coasters for a while but wanted them to look more vintage than shabby chic.
 
I found these blank wood coasters at Joann for $1 and I used a coupon that was about to expire on them...making them just $.60. Sweet!
 

I found a font I wanted to copy (this one is EcuyerDAX from dafont.com) and I printed the numbers out to create stencils. I traced each number with a sharpie marker and then free handed the boarders and lines.


I gave them two coats with a clear satin sealer that resists water and then one more coat of matte Mod Podge so I think they are well protected from our cold drinks;)


Now we have a new place for our newly thrifted owl glasses.


Hope you are having a lovely Tuesday!

Tuesday, November 27, 2012

DIY: Advent Calendar

I've never been consistent with the yearly Christmas advent calendar. The wooden ones in the store are cute...but I don't want to pack one...or try to find little things to fit in the spaces (it just leads to more little things to find between the couch cushions or to step on in the middle of the night, right?).
 
This year I decided I would do an activity themed calendar, filled with things we can do as a family. 
 
 
Oh, and did you notice I only have 20 cards in my calendar? Well, I decided to do a few less, that way if we miss a day...it's all good. (Plus, I only had 20 clothespins...so win, win.)
 
I made these cards in Photoshop, folded them in half, and wrote down 20 different things we can do as a family. I used an old frame and strung them on yarn taped to the back. Most of our activities cost little to no money.
 
Some examples are:
 
-have a slumber party in the living room
-write letters to family members telling them what we love most about them
-watch a Christmas movie
-pick a child off the Angel Tree at church and shop for them
-have dinner out on the patio
-get hot chocolate at a cafe'

 
I'm really looking forward to our month of family activities and teaching our children that it's not about opening a present every day...but about being together as a family and giving to others.
 
Happy Tuesday!


Thursday, September 27, 2012

DIY: Painted Pumpkins

 
Can I make a confession?
 
I am not a seasonal decorator.
 
I know...decorating and crafting for the seasons is like blogger content gold, right? But, it's just not me. It has something to do with living in smaller quarters and not wanting to store it and not wanting to clean it and not wanting to clutter the home.
 
I know, sometimes it's difficult to live in my head.
 
But I am trying my best this year to add a few more seasonal items to our home without feeling like I live in Hobby Lobby. Plus, I already have an obsessive amount a few owl decor pieces in my house...so that passes for fall decorations, right?
 
I picked up three pumpkins from the dollar store and repainted them so they fit into our vintage/modern decor.
 
STEP 1: I painted all the pumpkins with ivory paint.
 
STEP 2: (for the chevron pumpkin) I drew a chevron design on the painted pumpkin with a pencil and then painted in the lines with a deep orange acrylic paint.
 

STEP 3: (for the polka dot pumpkin) I dipped the end of a pencil eraser in black acrylic paint and stamped it on the pumpkin creating a polka dot pattern.
 
STEP 4: (the yellow pumpkin) I painted the whole pumpkin with two coats of mustard yellow acrylic paint.

 
STEP 5: I painted all the "stems" brown and then sealed each pumpkin with two coats of clear glossy spray paint.
 
This was a a fun project and it helped ease me into seasonal decorating...which I hope to get better at, and enjoy too!

I'm linked to:
Tatertots and Jello

Tuesday, August 28, 2012

Making a Creative Space

 
We have this weird cut out in our home. When we moved in...we weren't quite sure what to do with it. It's where the cable hook ups are for a television...but it's not center in the living room...and we don't have cable anyways.
 
I had my grandma's dresser in there for a while, then we let my brother borrow it for his new apartment. So, back to square one with "the nook".
 
At a trip to Ikea, I like the look of the wire and hooks they have to display art...but not the price ($12.99? No thanks.) so I decided to recreate the same idea for cheaper. I picked up one of their $1.99 curtain rods and a pack of curtain hooks for $2.99. My mom bought my daughter this table and chairs from Ikea too for her birthday (can't beat $19.99 for three pieces!) and it all fits perfectly.


There is a lot of crafting and creating in this space and my daughter loves that she gets to display her artwork in the living room for all to see. I love that it's a part of our home decor as well!


A $5 transformation that made my 4 year old and myself happy. Not too bad;) 

Monday, August 20, 2012

DIY: Love Your State Wall Art


When thinking up new wall art ideas for our master bedroom, I wanted something simple and personal. I've been seeing a lot of state themed art online and we love where we live...so it only seemed natural to incorporate it into our room somehow.


Wanna make your own? It's super simple! Here's how I made mine:

1. Traced the outline of our state off the computer.

2. Traced my template onto some cardstock and traced the edges with a black marker.

3. Cut out a tiny heart where our city is and glued it on. Then I glued it to another piece of cardstock and framed it.

Done!


We love our state! Do you?

Thursday, February 23, 2012

DIY Clock from Saucepan Lid


This is probably one of the most random projects I've done...and one of my favorite!

I saw this saucepan lid at Goodwill and fell in love with the pattern. There was no matching saucepan to go with it, but I decided I still needed to bring it home for just $1.

That's when I got the idea to turn it into a clock!

DIY CLOCK (from a saucepan lid)

STEP 1: Remove knob from saucepan.


STEP 2: Remove motor and parts from clock.
(At this point, I reassembled the clock pieces again and tested them with a battery to make sure taking them apart didn't break them.)


STEP 3: Assemble clock pieces through the hole on the saucepan lid where the knob used to be. Glue the motor to the back of the pan if needed. I also cut out some numbers from the original clock to Mod Podge on the front.


Have a great Thursday!

I'm linked to:

Wednesday, February 22, 2012

Creating Silhouettes (part two)

 I thought I would share a project that I did a while ago. Back when this blog was pretty new, I posted about creating silhouettes without the need of fancy software, or paying a company to make them for you.

Recently I made some silhouettes of the babes to put in our living room. I kinda love them a lot.


Eventhough I already posted how to do this...I will give another quick lesson!

CREATING A SILHOUETTE

STEP 1: Take a profile picture of your subject. Against a plain wall is best but not necessary. For the baby, (since he can't hold his head up yet) I had my husband hold him up against his shoulder so I could snap a quick picture.

STEP 2: Download the picture to your computer and enlarge to the size you want. Holding up a piece of white computer paper (or something similarly transparent) trace the outline of their profile. Cut out and now you have a template.

STEP 3: Use your template to trace onto another piece of paper or fabric, whatever your choice is for the finished silhouette.

I got the frames at the thrift store, painted them black, and then mounted the silhouettes onto white cardstock.


Monday, February 20, 2012

Curtains From a Duvet Part 2 (this time with a lining)


One of my most popular posts to date is the no sew curtains from a duvet that I made for our living room and dining room. It amazes me how many visits it gets each week.

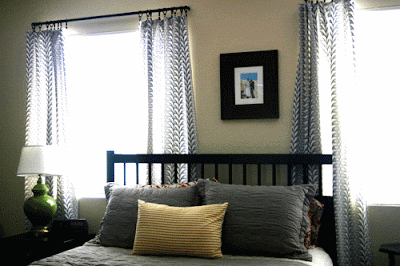
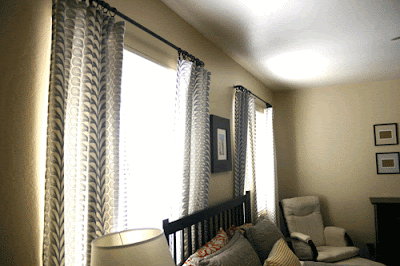
I found another Ikea duvet at the thrift store and knew it would be perfect for the two windows in our bedroom. This time I wanted to line them with another fabric on the back to keep out more light. Baby  boy still shares our room with us (before he can share a room with his big sis) and so, the less light in there during the day...the more likely he is to stay asleep during naptime:)

LINED CURTAINS FROM A DUVET

1 queen size DUVET
2 queen size FLAT SHEETS
MATCHING THREAD

STEP 1: Cut two layers of duvet apart. Then cut each large panel into two curtain panels (You will now have 4 panels). Cut the panels to the length that you need for your windows plus 2" for seams. Cut your flat sheets to the same size as your printed panels.

STEP 2: With right sides facing, sew one duvet panel to one sheet panel (with a 1/2" seam), leaving a gap at the bottom to flip right side out.

STEP 3: Flip right side out, fold in the gap, and top stitch all the way around the panel 1/4" from the edge. Clip to some curtain clips and you're done!


I'm linked to:

Thursday, February 16, 2012

Make Fabric Picture Mattings with Freezer Paper


We renewed the lease on our condo a few weeks ago so I thought it might be about time to finally finish decorating our bedroom. It's never officially been completed in our entire marriage..let's just say my husband is a very patient man. Maybe you other renters can relate? It's hard to put a lot of time (let alone money) into a place that you might leave in year, am I right?

I found these square frames at the dollar store and decided that they would be perfect for above our large dresser. Normally I don't do the whole "symmetrical decorating" thing...but I thought it might be a good combination with some vintage fabric flair.

I double matted the frames, using posterboard below and fabric mattings above.

Here is how I created them:

STEP 1: Iron a piece of freezer paper (shiny side down) to the back of your fabric in the same size that you need your matting to be. Make a matting template out of posterboard and trace it onto the paper side of the freezer paper.


STEP 2: Cut out the fabric/freezer paper matting and place it in your frame! Mine here is over the plain white matting below since I like the layered look.


You could try and peel the freezer paper off the back of the fabric before placing it in your frame, but I thought leaving it on might add some more stability and keep the edges from fraying.

The best part was I didn't need to purchase any fabric since I already had what I needed. All that was spent was $8 for the frames. Boo-ya!


I think the most fun will be going through our old photos tonight and picking out which ones we want to frame.

Happy Thursday!

I'm linked to:


Tuesday, September 27, 2011

Simple Jewelry Organization


I've mentioned before that my nesting stage is in full swing over here. I have been trying to get everything as organized as I can before this baby comes in the next 7 weeks! If only there was enough physical energy to keep up with all the thoughts and plans racing through my mind:)

One area that needed some serious organization was my jewelry. I shared how I organize my earrings and since my earring stash has grown just a tad over the last year I needed a slightly larger frame with some room to grow (because who can resist that $1.50 rack at Forever 21??). I used a frame that I got at Goodwill and I just stained it a tad to fill in where it was dented and scratched.


My necklaces were the biggest problem. I had them ALL on one hanger in our closet and I can't even count how many times I would end up trying to pick out ONE and getting a whole knot of them about 5 minutes before we were supposed to leave for church. Nothing puts you in the mood for a nice, relaxing Sunday morning more than yelling at your mess of necklaces while hoping that shaking the whole mess will somehow untangle them all! And then having your husband say something about knowing where your 3 year old gets her tantrums from....

Ahh...here they are all nice and separated (with just two or three on each hook).


I found these tiny hooks at Target and my husband drilled holes into the inside edge of the frame and then I screwed them in. Super easy!


So now my jewelry is organized and easy to find. I decided not to use fabric on the back of the necklace frame for now, but I may add some later:)


Doesn't organizing feel good? It just brings down my stress level so much...and that's something I need in my third trimester and with a 3 year old:)

Friday, September 23, 2011

DIY Baby Mobile


I have been waiting to post about the baby mobile I made a week ago. I wanted it installed above the crib...but thus far it is still hanging in our dining room:)


I decided to use paper so it would be lightweight...and also because Michael's was having a sale on their scrapbook paper (6 for $1!). I picked out 6 of my favorite prints and also found some solid colors in my small stash at home.


Here is how I made my baby mobile:


First I decided how many circles I wanted. I used two embroidery hoops so the mobile would be fuller and decided I wanted about 40 circles for the biggest hoop and 24 circles for the smallest hoop. (Each string has 4 circles on it).


So, I cut out as many circles as I could get from each piece of scrapbook paper (16). Some of the papers I had were just one sided...so I needed two circles to put back to back. I ended up cutting out about 128 circles and had a few left over.


I started arranging the circles in a pattern that I liked and sewed them together on my sewing machine. I started with a long strand at the top and sewed through one circle, pulled the string out a few inches, and then sewed the next circle.


Here are all my circle strands for the first hoop all laid out:


I took the long thread at the top of each strand and wrapped it around the embroidery hoop a few times and tacked it with a little hot glue on the inside of the hoop. I repeated with the rest of the strands in even segments all the way around.


Once I had all my 10 strands on my large hoop, I repeated the whole process with the smaller hoop (this time 6 strands with 4 circles each).


I took clear beading string and tied the smaller hoop to the inside of the larger hoop. Then I tied two "handles" to the top of the largest loop so I could hang it from a hook in the ceiling. Lastly, I glued some brown ribbon to the outside of both hoops to cover my threads.


I think it makes for an interesting view for the baby...what do you think?


I love that the circles move softly all the time so it always looks different. Also, the yellow and brown papers are actually the same paper...just different colors on both sides so it makes for a fun change every time they move around.


The best part about this project was I used what I already had in my craft closet (minus the 6 papers I got for $1)...so woo-hoo for being resourceful!


Hmmm...maybe now we can actually move this thing upstairs and over the baby's crib within the next 7 weeks so he can enjoy it?

I'm linked to:

LinkWithin

Related Posts with Thumbnails