Showing posts with label scraps. Show all posts

Wednesday, July 18, 2012

DIY: Fabric Scrap Map


When I saw this map idea...I knew I had to make my own version. I made this map before Jack was born and finally got around to framing it. I used an Ikea frame that I found at Goodwill, and matted it with posterboard.

FABRIC SCRAP MAP
1 large piece of fabric (mine was 20x27)
Scrap fabric
United States template (I found a blank map on Google and blew it up to print it out)
Heat N' Bond
Iron
STEP 1: Print out map and cut out each state.
STEP 2: Iron fabric scraps onto one side of Heat N' Bond per the package instructions.
STEP 3: Trace each state's template onto paper side of Heat N' Bond fabric scraps.
(REMEMBER: When tracing the states, the image will be mirrored once you iron it on...so make sure to trace each state backwards, so that it will face the right way once ironed together)
STEP 4: Iron on each state to your large piece of fabric in order, starting with California first, and working your way east.
OPTIONAL: You can also stitch down the edges of each state. I chose not to since my map was on the smaller size. I also framed it under plastic, so I'm not worried about it falling apart over time.

I'm so excited to have this project done. Within the first 5 minutes of putting it up, my daughter was asking the names of every state (while also telling me what other projects I have made with the same fabric.)


Have a lovely Wednesday!

I'm linked to:

Tatertots and Jello


The Southern Institute

Thursday, April 26, 2012

DIY Twisted Turban Headband (from an old t-shirt)


I had an old shirt that I was about to donate, but I loved the print so much I wanted to find something to do with it. I love the twisted headbands I have been seeing everywhere and decided to make one of my own.

Materials:

knit fabric (or old t-shirt)

matching thread

STEP 1: Cut two strips out of the knit fabric. that are double the final width you want your headband straps to be. My strips were approximately 4 in x 20 in.


STEP 2: Fold each strip in half (with right sides facing) and sew down the long side of raw edges. Flip right side out. Now you will have two "tubes".


STEP 3: Lay out tubes (seam sides up) in the shape of an "X". 

STEP 4: Fold strips over so that they are linked together, matching up the raw edges.


STEP 5: Take the unfinished headband and wrap around your head to see how tight to make it. Line up all raw edges and sew together with a straight stitch. Cut off any excess.


STEP 6: Flip seam to the inside of headband and wear!


Happy Thursday!

I'm linked to:


Tuesday, April 10, 2012

Black Apple Dolls


 I'm sure you have seen Black Apple Dolls everywhere lately. I downloaded the pattern a long time ago and finally got around to using it recently.

Our close friends moved away and our daughters were also close, so they have been missing each other. So, I decided to make matching dolls for the girls in their own likeness.

This was a great stash busting project and I had fun coming up with new dress combinations for each girl.


It was such a fun project and I'm so glad each girl loved their doll! Now my daughter feels closer to them even while they are far apart;)

I'm linked to:

Tatertots and Jello

Thursday, February 16, 2012

Make Fabric Picture Mattings with Freezer Paper


We renewed the lease on our condo a few weeks ago so I thought it might be about time to finally finish decorating our bedroom. It's never officially been completed in our entire marriage..let's just say my husband is a very patient man. Maybe you other renters can relate? It's hard to put a lot of time (let alone money) into a place that you might leave in year, am I right?

I found these square frames at the dollar store and decided that they would be perfect for above our large dresser. Normally I don't do the whole "symmetrical decorating" thing...but I thought it might be a good combination with some vintage fabric flair.

I double matted the frames, using posterboard below and fabric mattings above.

Here is how I created them:

STEP 1: Iron a piece of freezer paper (shiny side down) to the back of your fabric in the same size that you need your matting to be. Make a matting template out of posterboard and trace it onto the paper side of the freezer paper.


STEP 2: Cut out the fabric/freezer paper matting and place it in your frame! Mine here is over the plain white matting below since I like the layered look.


You could try and peel the freezer paper off the back of the fabric before placing it in your frame, but I thought leaving it on might add some more stability and keep the edges from fraying.

The best part was I didn't need to purchase any fabric since I already had what I needed. All that was spent was $8 for the frames. Boo-ya!


I think the most fun will be going through our old photos tonight and picking out which ones we want to frame.

Happy Thursday!

I'm linked to:


Monday, September 5, 2011

Applique Baby Hat


I have been working on a few baby crafts this week, and one was a hat for our little guy. He will be a fall baby and the weather will be getting colder shortly after he is born...so I need to keep his head warm. He can also be stylish at the same time, right?


This is a simple way to change up an existing baby hat. I found this black hat at the thrift store with the tags still attached for $.69. I used some left over material from my bassinet makeover and some heat and bond.


The first thing I did was use my seam ripper to open up the seams where the ears were and remove them.


You can see that there were two holes (where my fingers are poking through).


So, I flipped the hat inside out and sewed up the seam openings with matching thread on my sewing machine:


I flipped the hat right side out again and ironed on my applique. You can learn more here about how to make (and apply) an applique.


After I ironed on my applique, I stitched around it on my sewing machine:


The End:)

Wednesday, August 31, 2011

Fabric Coasters from Vintage Scraps


I've hit my nesting stage of pregnancy with full force this week. One project I decided to tackle was our entry way closet, which is home to my craft supplies. After organizing everything (while making a list of what supplies I have and future crafts I want to make), I decided not to bring in any new materials until I started to use up what I have.


One thing I decided to do with all my vintage scraps that I just can't seem to throw away is make coasters. This was a super easy project that I got done in about 30 minutes.


There are a ton of fabric coaster tutorials online and this one from Make It and Love It was the closest to what I did. The only difference is that I ironed on my fusible fleece onto the wrong side of my printed fabric first and then sewed my two pieces together.


Now I get to see my favorite fabric scraps every day, while protecting our delicate craigslist Ikea furniture:)


I'm linked to:


Sew Much Ado


Tatertots and Jello

Thursday, August 25, 2011

Felt Flower Bobby Pins


I recently found this tutorial for these felt flowers and decided I needed some of my own! I whipped up some this week after my daughter went to bed and now we have new clips that we can share:)


I'm linked to:


Tatertots and Jello


Mine for the Making

Tuesday, July 26, 2011

Embellished Short Sleeve Cardigan from a Long Sleeve Cardigan


I love me a good cardigan. They are so comfy and a great wardrobe staple to add to a dress or a shirt and jeans. I also love that they hide my arms!:)


Maternity clothes have been hard for me to come by lately (seriously, who wants to spend $20 on a pair or shorts that will only be worn for a few months??) and I wanted a new little coat to wear now that it's summer.


I found a long sleeve cardigan at my local thrift store for $1 and decided I could turn it into a more modern looking one with a little flair.


I started by trying on the sweater and seeing where I wanted the sleeves to be (a little below my elbow) and cut off the sleeves at that length. I also cut the ribbed cuff off with a 1/2" extra at the top. I saved the pieces of the sleeve that I cut out to make the embellishments for later.


Next, I flipped the cuff inside out and lined up the seam on the cuff with the seam on the sleeve (with raw edges of cuff and sleeve aligned) and pinned in place.


I took the base attachment off my sewing machine and stretched the cuff and sleeve onto my sewing machine and sewed around the whole cuff with a 1/2" seam allowance.


Here is the new cuff flipped right side out again.


To make it look less like I hacked my own sweater, I put the new sleeve on my machine again (with the sleeve right side out this time) and sewed a 1/4" top stitch above my cuff seam line.


This made the new sleeve look less "puffy" where I had reattached the cuff and made it look more like it came that way originally.


I repeated the process on the other side and when I was done I took my sleeve pieces that I had set aside and cut them into circles (I got 16 circles total from both pieces).


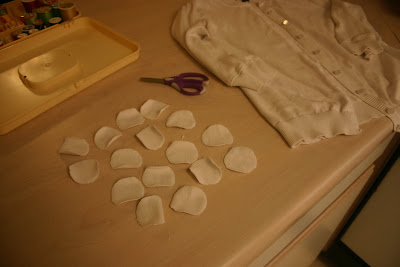
After playing around with a few designs, I noticed the circles just kept folding up into little "tacos" all on their own..so I decided to keep that same form and sew them along the inside of the cardigan. I sewed 8 circle "tacos" on each side.


I started by sewing a straight stitch down the middle of the circles (adding a new circle as I went on the machine) and then to keep them in place a little better, I sewed two additional stitches on either side of my center stitch.


Here is one of the worst pictures of me modeling the cardigan for you:) Oh well, my husband wasn't home to take a picture and we are leaving for CA in a day...so no time to waste people! Note to self: Pregnant bellies don't photograph well from the front...


So that's my $1 cardigan transformation! This process could be done to make the sleeves any length that you want...as long as the cuff will fit the part of your arm that you are adjusting it to:)


OK, I'm off to California for the weekend! And although I won't be going to Disneyland (seriously...I'm SO bummed about that) I can't wait to sit on a beach and do nothing! Well, there will be some sight seeing involved, a visit to the town where I was born, and a Pink's Hot Dog as well:)


If any of you live ( or love) the Anaheim / Los Angeles area and have some fun ideas for what we could do while we are there...PLEASE leave them in the comments section! We aren't super touristy...but we would love to try out some new and exciting things while we are by the coast;)

Friday, July 8, 2011

Baby Clothes Quilt: Part 4...Finished!!


My daughter's baby clothes quilt is finally finished! It was a lot more work than I anticipated...but also SO much fun.


Once I got all my squares sewed together and the seams ironed on the back, it was time finish it up.


I took my backing material (a twin sheet) and laid that face up on the floor, then my squares went on top of that (face down) and then finally the batting on top of it all. I used the lowest loft batting by the yard at Joanns.


I pinned all the way around and stitched all the way around as well..leaving a 12" opening so I could turn it right side out.


Once I turned it right side out, I folded in my opening and top stitched around the entire blanket with about a 1/4" seam. I did it this way because I didn't want to put binding on the ends of the blanket.


Now I had a blanket...but it needed to be secured in certain spots to keep the layers from shifting.


Instead of quilting this in the traditional sense (a lot of stitching over the entire blanket)...I opted for a less noticeable way of securing the blanket in even spots. There are some embellishments (buttons, pockets, and bows) on this blanket so I wasn't sure how quilting it all over would work or look in the end and I didn't want to distract from the clothing.


I measured out equal spots to sew and pinned those areas. Basically I pinned the meeting corners of every other square (in every other row). Then, I sewed a small straight line on that seam where the squares met. It was very simple and is not noticeable from the front.


That completed my first baby clothes quilt!


I tried to cut out as much from each piece of clothing that had the most character such as pockets, bows, or buttons.


Here is the back of the quilt. I found this flat sheet at the thrift store and it had polka dots in all colors so I thought it complemented the front of the blanket nicely without distracting from it.


Here you can see my little stitches to keep the blanket from shifting:


I'm SO happy with the way it turned out! I also can't believe I actually finished it! It was one of those things on my crafting "to do" list that I am so happy to cross off. Cutting the clothes up was by far the hardest part (emotionally)...but seeing it all put together into something that can last years and years is so worth it.


I have to admit the first night I finished it, I sat on the couch and cuddled with it:) I know my daughter is only 3 (going on 30), but as she grows older and older I am finding out that they only stay little for a short amount of time. One day I will get to make one for our little guy too:)


Price:


clothes: already had


2 yds lightweight fusible interfacing (for stabilizing knit materials): $2.50


2 yds of low loft batting: $3.99 (with 50% sale)


polka dot backing material (thrifted twin sheet): $1.50


Total: $7.99


But really...this blanket it priceless:)


I'm linked to:


Tatertots and Jello


Sugar and Dots

LinkWithin

Related Posts with Thumbnails