Showing posts with label food. Show all posts

Friday, April 19, 2013

RECIPE: Crescent Roll Cinnamon Rolls

I had a can of crescent roll dough in my refrigerator that was about to go bad and I decided to experiment and try to create semi-homemade cinnamon rolls. They actually turned out super yummy and are an easy "go to" on a Saturday morning when the family is demanding sugary carbs.
 

CRESCENT ROLL CINNAMON ROLLS
 
1 can CRESCENT ROLL DOUGH
 
1 tbsp BUTTER
 
1/8 cup sugar
 
1 tbsp BROWN SUGAR
 
1-2 tbsp CINNAMON (depending on how much you like cinnamon)
 
STEP 1: Roll out the pastry dough and press seams together. Spread butter on the dough.
 
STEP 2: Mix together sugars and cinnamon. Sprinkle over buttered dough and roll up tight.
 
STEP 3: Cut into 1" slices and place on a cookie sheet lined with parchment paper. Bake for amount of time on dough package (but keep an eye on them and take them out as soon as the tops are browned).
 
While rolls are cooling, make the icing:
 
1/2 cup POWDERED SUGAR
 
splash of milk or water (about 2 tsp to 1 tbsp)
 
1 tsp CINNAMON
 
STEP 1: Mix together powdered sugar and milk until you get a thick glue consistency, add more liquid if you need to. Mix in cinnamon and a little vanilla extract if you like.
 
STEP 2: Drizzle icing over cinnamon rolls while they are still warm and enjoy!
 
(I have also made these by adding in some broken up walnuts and they were even yummier!)


Thursday, September 13, 2012

Cinnamon Roll Pancakes

 
We ate a lot of pancakes on vacation...and I mean a LOT. We created a new family tradition of going to IHOP after Disneyland. There is nothing like feasting on breakfast foods after a long day of having fun!
 
With that said, we kind of went through a pancake withdrawal when we got home. I had a crazy craving for a cinnamon pancake today so I decided to invent one!
 
CINNAMON ROLL PANCAKES
(makes 8-10 pancakes)
 
PANCAKE MIX (or your favorite pancake recipe)
 
3 Tbsp BUTTER or margarine
 
1/4 c CINNAMON
 
1/4 c GRANULATED SUGAR
 
STEP 1: Mix up your pancake batter per package instructions. Make enough for 8-10 pancakes. Set aside.
 
STEP 2: Melt butter and then stir in cinnamon and sugar until dissolved.
 
STEP 3: Pour cinnamon mixture into ziplock bag and cut off the corner just enough so the mixture can flow out.
 
STEP 4: Pour pancake mixture onto griddle. Swirl cinnamon mixture over pancake batter. Flip pancakes once they have bubbled up. Cook through on other side and serve!
 
OPTIONAL: I served these with a cinnamon roll "icing" by mixing together 1 c of powdered sugar and stirring in 2-3 Tbsp of water.
 
Do you love pancakes? What's your favorite variety?

I'm linked to:
Tatertots and Jello

Wednesday, May 16, 2012

Fresh Pico de Gallo

I love me some salsa. Any kind...I'm all for it. Pico de Gallo has got to be my favorite, and I always make a large batch to share!


PICO DE GALLO
(from Allrecipes)

6 ROMA TOMATOES, diced


1/2 RED ONION, minced

3 tablespoons chopped FRESH CILANTRO

1/2 JALAPENO PEPPER, seeded and minced

1/2 LIME, juiced

1 clove GARLIC, minced

1 pinch GARLIC POWDER

SALT and ground BLACK PEPPER to taste
 
STEP 1: Mix all ingredients together and refrigerate at least 3 hours before serving.
 
NOTE: I don't like runny salsa, so I squeeze out the juice and seeds from my tomatoes. I also make double the recipe to have enough to share and for me to put on...well...everything!

Thursday, May 3, 2012

Strawberry Lemon Yogurt Cake

So, um, this cake is amazing. Like, "I only had this last piece to photograph and share and then I ate it right after I snapped a photo" amazing.

I'm not normally a big cake person, but this one is so moist...amazing. Wait, did I say that already?


STRAWBERRY LEMON YOGURT CAKE

1 cup (2 sticks) BUTTER, softened


2 cups SUGAR
3 EGGS

3 Tb. LEMON JUICE, divided

LEMON ZEST of 1 lemon

2 ½ cups all-purpose FLOUR, divided

½ tsp. BAKING SODA

½ tsp. SALT

8 oz. VANILLA YOGURT

12 oz. fresh STRAWBERRIES, diced

1 cup POWDERED SUGAR

STEP 1: Preheat oven to 325 degrees.  Grease and flour a 10 inch Bundt pan. Sift together 2 ¼ cups of flour, baking soda and salt. Mix in the lemon zest and set aside.

STEP 2: With an electric mixer, cream together the butter and sugar until light and fluffy. Beat in the eggs one at a time, then stir in 1 Tb. lemon juice. Alternate beating in the flour mixture and the yogurt, mixing just until incorporated.

STEP 3: Toss the strawberries with the remaining ¼ cup of flour. Gently mix them into the batter.

STEP 4: Pour the batter into the Bundt pan. Bake for 60 minutes, or until a toothpick inserted into the center of the cake comes out clean.

STEP 5: Allow to cool at least 20 minutes in the pan, then turn out onto a wire rack and cool completely. Once cooled, whisk together the remaining 2 Tb. of lemon juice and the powdered sugar. Drizzle over the top of the cake

The, serve to your family...if you haven't eaten the whole thing yet.

Happy Thursday!


Monday, April 9, 2012

Easy Perfectly Moist Turkey Recipe


I already shared how my husband and I were making our first turkey, and I have to be honest...I was pretty scared. I wasn't sure if it was just going to totally deflate as soon as we cut into it like on Christmas Vacation or if it would be raw inside.

I read a lot online for the "perfect" recipe. Some people said that a brine was the only way to go...others said a roasting bag was the best way.

I needed the best tasting recipe AND the easiest.

We finally just took a bunch of ideas that we liked from many recipes and made up our own! It turned out SO moist I can't believe it! It carved beautifully and no one needed a knife to cut it.

Turkey perfection was achieved.

Now, I have to give 99% of the credit to my husband because he shoved his hand up the bird, he rubbed it down with butter, he carved it,...and he reads this blog;) All in all it was a really fun experience to have together and we made a better turkey than my mom, just sayin'.

PERFECTLY MOIST TURKEY

1 (18lb) TURKEY

1 ONION

2 small ORANGES (or 1 large)

1 LEMON

3 tbs BUTTER

3 cups CHICKEN BROTH

2 tsp SALT

2 tsp PEPPER

2 tsp GARLIC POWDER

1 tsp PARSLEY FLAKES (optional)

STEP 1: Place turkey in a roasting pan. Cut onion, oranges, and lemon into quarters and stuff the turkey with them.

STEP 2: Take half the butter and rub it under the skin of the turkey. It's easier to separate the skin from the meat first and then spread the butter on. Do this all over the breast meat.

STEP 3: Mix salt, pepper, garlic powder, and parsley together. Spread half under the skin of the breast meat.

STEP 4: Rub remaining butter and spices on top of the turkey on both breast and thighs.

STEP 5: Pour 2 cups of the broth in the bottom of the pan. Lower oven rack to the lowest setting and preheat the oven to 350 degrees.

STEP 6: Make an foil tent over the turkey and bake for about 4 hours (or until internal temperature of the thigh meat reaches 180 degrees). Baste turkey with broth every 30 minutes while cooking and fill up bottom with remaining broth if needed. Also, remove the foil tent for the last 30 minutes of cooking.

Enjoy!

Sunday, April 8, 2012

Corn Syrup Free Pecan Pie

I've always had a love hate relationship with pecan pie. While I love the overall flavor, it always seemed too sticky and sweet to me.

My husband hinted that he would like a pecan pie for our Easter dinner this year so I went online to fine a recipe and this one got hundreds of positive reviews and I noticed it didn't have any corn syrup in the recipe so I knew it was worth a try!

I'm so glad I took a chance because it is SO good! It has the same flavor as a traditional pecan pie with a lighter texture.


 CORN SYRUP FREE PECAN PIE
(found at Allrecipes)

1 cup light brown sugar


1/4 cup white SUGAR
1/2 cup BUTTER
2 EGGS
1 tablespoon all-purpose FLOUR
1 tablespoon MILK
1 teaspoon VANILLA EXTRACT
1 cup chopped PECANS

1  PIE SHELL

STEP 1: Preheat oven to 400 degrees.
STEP 2: In a large bowl, beat eggs until foamy, and stir in melted butter. Stir in the brown sugar, white sugar and the flour; mix well. Last add the milk, vanilla and nuts.

STEP 3: Pour into unbaked 9-in pie shell. Bake in preheated oven for 10 minutes at 400 degrees, then reduce temperature to 350 degrees and bake for 30 to 40 minutes, or until done


Eat and enjoy!

I'm linked to:

Tatertots and Jello

Saturday, April 7, 2012

My First Turkey....maybe.

My husband won a turkey in a raffle at work last Thanksgiving. The only problem was they gave it to him the night before Thanksgiving so we already had a turkey and this one was frozen solid anyways. So, it's been sitting in our freezer for the last few months ready to  make it's debut this Easter Sunday!

Oh, did I mention I have never made a turkey before?

Well, I have never made a turkey before.

I looked up a ton of recipes online, looking for the one with the most positive reviews. I found one I liked and we are going to try it out!


(it's stuffed with onions, oranges, lemon, and rubbed down with butter, salt, and pepper.)

I have to give all the credit to my husband. He cleaned it, stuffed it, and rubbed it down for his squeamish wife. We did have fun telling dirty jokes while he was massaging it though:)

Because that's what mature people do.

I'm sure of it.

So, I can't wait to share with you all how it turned out!

Have you made a turkey before? I feel pretty grown up now that I have attempted it.

You know, because being married and having kids didn't make me feel grown up already.

Hope you have a lovely Sunday!

Thursday, April 5, 2012

Turtle Cheesecake Truffles

 Every holiday I make a cheesecake for our family dinners. While looking up new recipes I came across this one and knew I had to try them!

TURTLE CHEESECAKE TRUFFLES

1 pkg (8oz) CREAM CHEESE

1 cup GRAHAM CRACKER CRUMBS

1 pkg CHOCOLATE MELTS (or almond bark)

1/4 c CHOPPED PECANS

CARAMEL TOPPING

STEP 1: Mix together cream cheese and graham cracker crumbs. Scoop with a spoon and form into balls. Place on cookie sheet lined with parchment or wax paper and place in freezer.

Step 2: While cream cheese is in the freezer, melt the chocolate per the package instructions. Take cheesecake out of the freezer and dip into melted chocolate. Tap off extra chocolate and place back on cookie sheet.

STEP 3: Sprinkle pecans on top before chocolate hardens. Drizzle with caramel topping.

 These are SO good! I was worried they would have too much of a salty taste since no sugar is added to the cream cheese mixture, but it is a perfect combination with the chocolate and caramel on the outside.


Now, let's see if they make it until Easter Sunday!

I'm linked to:

Tatertots and Jello

Wednesday, April 4, 2012

Tomato and Sausage Pizza Pie


My friend told me about this recipe a few weeks ago and it appealed to me immediately. I love trying new recipes...especially ones where I can have some freedom to customize them.


TOMATO SAUSAGE PIZZA PIE

1 roll out PIE CRUST

2-3 TOMATOES

1/2 c COOKED SAUSAGE

1 c shredded MOZZARELLA

OLIVE OIL

SALT and PEPPER
STEP 1: Roll out uncooked pie crust onto cookie sheet lined with parchment paper.

STEP 2: Slice tomatoes and arrange in the middle of the crust, leaving a 1 inch border all the way around.

STEP 3: Layer on sausage and top with cheese. Fold edges of pie crust up and over the outer edge of the tomatoes. Brush edges of crust with olive oil and sprinkle a little salt and pepper over the top if desired.

STEP 4: Bake at 375 degrees for 30-35 minutes.

This was SO good and I can't wait to try more varieties. I am feeling spinach and artichokes next. Maybe some turkey bacon and olives with a little basil pesto on the bottom? Mmmm...pizza.

I'm linked to:

Monday, March 26, 2012

Grilled Cheese Challenge #1: The Sergeant Pepper

*First off I have a wonderful announcement! (No...I'm not pregnant...that's not even funny 4 months after having a baby.)

My husband got me a new Canon Rebel for my birthday!!!

...and yes, that deserved a large font. It was a total surprise and I am in love folks. True love.

I will be selling my old Rebel to a good home and it's onward with HD pictures and video baby! I need to learn a LOT more about photography too now that I have a camera that is the shizz.

Now back to our scheduled blog post:


Hands down, grilled cheese is my favorite food of all time. Um, cheese and carbs? Yes please! So, it was only natural that when I found The Grilled Cheese Academy, I had to take it upon myself to try each of their 30 grilled cheese varieties. So, each weekend I will be trying a new sandwich and sharing it here!

Grilled Cheese #1:

The Sergeant Pepper
(sandwich recipe found HERE and onion ring recipe found HERE)

8 slices SOURDOUGH BREAD

4 slices CHEDDAR CHEESE

4 slices PEPPER JACK CHEESE

1 YELLOW ONION

1 c BREAD CRUMBS

1 c FLOUR

1 EGG

1/2 c MILK

1/2 c WATER

1 tsp BAKING POWDER

1 tsp SALT

1 tsp PEPPER

2 tbsp OLIVE OIL

VEGETABLE OIL for frying

STEP 1: Mix together flour, salt, pepper, and baking powder. In a separate bowl, mix together milk and egg. Stir egg mixture into flour mixture and add 1/2 c water to make a batter for the onion rings.

STEP 2: Slice onion and separate rings. Dip in batter and then roll in bread crumbs. Fry in vegetable oil (over med-high heat) until brown and crispy). Drain on paper towel.

STEP 3: Brush olive oil on outsides of bread and then on the inside, layer pepper jack cheese, onion rings, cheddar cheese, and then other slice of bread on top. Grill and brown both sides.

If you read the original recipe you see that the onion ring recipe is different and it also calls for cauliflower on the sandwich. I omitted the cauliflower and found another onion ring  recipe online that sounded more appetizing. You could also cut out a lot of work by just putting on some already made onion rings from the frozen food section.

Week 1 of the grilled cheese challenge was a success! I hope the next one tastes just as good;)

Friday, March 16, 2012

Smores on a Stick!


Yes, the title of this post needed an exclamation point. Smores are a favorite in our house, but we rarely take the time to light a fire and make them the good old fashioned way.

I actually had all the traditional smores ingredients in my pantry, but my eye also glanced over to the some left over lollipop sticks and I decided I need to try and make a classy smore...on a stick.

SMORES ON A STICK

1 package large MARSHMELLOWS

ALMOND BARK

4 large GRAHAM CRACKERS

LOLLIPOP STICKS

STEP 1: Insert lollipop sticks into bottom of marshmallows and press through until they almost comes out the top.

STEP 2: Melt almond bark per package directions. You need about a cup of melted chocolate. Add about a tsp of vegetable oil to thin if needed.

STEP 3: Crush up graham crackers and place in bowl.

STEP 4: Dip marshmallow's into melted chocolate. Tap on side of the to get excess chocolate off and then roll in graham cracker pieces. Place in cup to stand up while the chocolate hardens.

STEP 5: Repeat with rest of marshmallows and place them all in the refrigerator for 5 minutes to allow chocolate to completely harden. Then they can be kept out at room temperature.

I also half dipped some and I think they are pretty cute too.


These are so good and really do have the smores taste!


I'm linked to:


Saturday, March 10, 2012

Chocolate Covered Peanut Butter Crackers


I love salty sweet combinations, so naturally peanut butter and chocolate are probably my favorite. Peanut butter M & Ms are not allowed in this house...seriously.

These are a fun cookie to make that combine salty, sweet, and carbs. Now how could they be bad??

CHOCOLATE COVERED PEANUT BUTTER CRACKERS

1 box SNACK CRACKERS (I used Ritz)

PEANUT BUTTER

CHOCOLATE ALMOND BARK

STEP 1: Spread peanut butter on inside of one cracker and put another cracker on top. Press down until peanut butter comes to the edges.

STEP 2: Melt some almond bark in the microwave per package instructions. Thin it out with a little vegetable oil if needed.

STEP 3: Dip crackers in melted almond bark and let harden on wax paper.

I had some left over white chocolate melts from the oreo pops I made, so I also melted that and drizzled it over the top.

Sunday, March 4, 2012

$1 Cake Pop Stand


I made Oreo pops for my daughter's party...and then somehow forgot that I needed a place to put them! I looked into cake pop stands online...um...no. I could have a lot more fun at Goodwill with that kind of money.

Then I priced styrofoam at the craft store.

No, again.

So, I turned to my trusty friend, foam board. It never lets me down.

Want the tute? Here we go!

FOAM BOARD POP STAND

1 piece of FOAM BOARD
(I get mine at the dollar store)

1-2 sheets of TISSUE PAPER

SMALL SCREWDRIVER
(slightly smaller in diameter than your pop sticks)

SERVING DISH (or ribbon)


STEP 1: Take a serving dish of your choice and trace the bottom of it onto foam board. Basically you want the same shape as the inner center so the foam board can sit inside the serving dish.

STEP 2: Cut out two pieces of foam board and hot glue them together.

STEP 3: Cover the board with tissue paper.

STEP 4: Either place covered board in serving dish (keep in place with a few pieces of tape on the bottom), or cover the edge with a thick ribbon and sit on the table as is.

STEP 5: Take screwdriver and poke holes where you want the pops to go. I did this right before serving so I would know how far apart to space each hole.

That's it! You could also make this thicker by adding more layers of foam. Two layers is the minimum to make the pops stand and not fall over. You could also use fabric instead of tissue paper, you might just need something sharper than a screwdriver to make the holes.

OK, time to go make more treats that stand up!

Friday, March 2, 2012

Cake Pop Challenged? Make Oreo Pops!


I think I might be the only person in blogland that can't make a cake pop. The whole process normally leaves me in tears, or cursing...or both. It's not the cake part that normally gets me...it's the dipping. I can never get the candy melts the right consistency and so I have avoided the issue all together. Each time I pass the little candy melts in the craft store I feel like they are mocking me.

That ends today.

I decided I was going to learn this whole "dipping things in pretty colored candy" thing.

I decided to start out with Oreos...cause at least if the whole project turned into a disaster, then I could eat the Oreos while I cried...and cursed. Win win for me.

But I did it! I conquered the task, and yes, I am being way overly dramatic about it!

Wanna make Oreo pops too? Let's go!

OREO POPS

2 pkgs DOUBLE STUFFED OREOS
(It's important to buy the double stuffed so the sucker stick will fit in the middle)

1 bag CANDY MELTS

1 pkg sucker STICKS

2 tbsp VEGETABLE OIL

STEP 1: Insert sucker sticks into the center of each Oreo. I pushed them up until I could just about feel them poke out the top of the cream. Put in refrigerator while melting the candy.

STEP 2: Pour 1/2 bag of candy melts into microwaveable bowl. (I used a glass measuring cup) and microwave in 30 second increments, stirring in between, until melted. It only took two times in my microwave.

STEP 3: While candy are still hot, mix in 2 tsp-1tbsp vegetable oil until desired consistency. Don't add more than 1 tbsp of oil or the candy will taste oily.

STEP 4: Take Oreos out of the fridge and dip them into the candy. I found it was easiest by coating one side completely and then turning to coat the other side. Lay down on wax paper and add sprinkles one side.

STEP 5: Place in freezer for 5-10 minutes or until candy has set.

Um...then eat.


Now that I have dipping confidence...I'm going to give cake pops another go!

I'm linked to:


Thursday, March 1, 2012

Rapunzel Party: Vanilla Vanilla Cupcakes


I decided to make cupcakes from scratch for my daughter's party this year. I have never done this before..so I read a lot online and decided to go with reliable Martha Stewart for my recipes and go with a classic vanilla cupcake with vanilla frosting.

VANILLA CUPCAKES

3 cups ALL PURPOSE FLOUR

1 1/2 tsp BAKING POWDER

3/4 tsp SALT

1 1/2 sticks softened UNSALTED BUTTER

1 1/2 cups SUGAR

4 large EGGS

2 tsp VANILLA EXTRACT

1 1/4 cups MILK

STEP 1: Preheat oven to 350 degrees. Line a standard 12-cup muffin tin with paper liners; set aside. Whisk together flour, baking powder, and salt in a medium bowl; set aside. Put butter and sugar in the bowl of an electric mixer. Mix on medium-high speed until pale and fluffy, about 3 minutes. Add eggs, 1 at a time, mixing well. Add vanilla. Reduce speed to medium. Mix in 3 batches of flour mixture, alternating with 2 batches of milk. Raise speed to medium-high; mix until thoroughly blended, 10 to 20 seconds.

STEP 2: Spoon 1/4 cup batter into each muffin cup. Bake until a cake tester inserted into centers comes out clean, about 17 minutes. Let cool in tin on wire racks 10 minutes. Remove cupcakes from tin; let cool completely. Line tin with muffin cups; repeat process with remaining batter.
 

FLUFFY VANILLA BUTTERCREAM FROSTING

I cut the original recipe in half and still had enough to frost 24 cupcakes with a #12 circle tip.

2 stick softened UNSALTED BUTTER

3 cups POWDERED SUGAR

1/4 tsp VANILLA EXTRACT

1 pinch of SALT

STEP 1: Put butter in bowl of an electric mixer. Beat on medium-high speed until pale and creamy, about 2 minutes. Reduce speed to medium; add sugar 1/2 cup at a time, mixing well, about 5 minutes total. Add vanilla and salt. Raise speed to medium-high; beat until smooth, about 1 minute more.

STEP 2: Fill icing bag with choice of decorator tip and icing and frost cupcake in a spiral motion, starting at the outer edge and working your way into the center to create a point.
(Note: If you use a larger tip than I did...you may need to make more icing to be able to frost 24 cupcakes.)

I didn't have time to make royal icing flowers for the tops...so silk flowers to the rescue! Ha! I "blinged" them up by adding little rhinestones to the centers.
 

The End
:)

I'm linked to:

Saturday, February 18, 2012

Pie Crust Cookies


I saw a recipe for these pie crust cookies this weekend and just happened to have a package of roll out pie crusts in my fridge...what are the odds, right?

These are super simple and are SO yummy! Major props to the hubs and me for saving a few for my to photograph for the blog the next day.

PIE CRUST COOKIES

Package of REFRIGERATED PIE CRUSTS (or leftover homemade crusts)
2 Tbs MELTED BUTTER
1/4 cup SUGAR
2 Tbsp CINNAMON
COOKIE CUTTERS
PARCHMENT PAPER (optional)

STEP 1: Roll out pie crust onto cookie sheet lined with parchment paper {the original recipe says to roll out on floured counter surface...but I didn't want to clean that up:)}

STEP 2: Spread melted butter onto pie crust with paper towel. Mix together sugar and cinnamon and sprinkle evenly over buttered pie crust.

STEP 3: Use cookie cutters to cut out cookie shapes. Peel off excess.


STEP 4: Bake at 400 degrees for about 7-8 minutes or until just slightly browned. Dust with powdered sugar if you like!

I couldn't resist cutting out mini hearts! I die with cuteness!


Try not to eat the whole plateful in one sitting. I dare you...:)


I'm linked to:


Wednesday, February 15, 2012

Candlestick Serving Stands


Since we are just having dessert at my daughter's birthday party, I have been thinking up ways to display all the sweets without just putting them in plain bowls. I came across these two glass candlesticks at Goodwill. I don't normally gravitate towards things like these, but I thought they looked so beautiful and elegant...perfect for a princess party, right?

I bought a set of two clear plastic bowls from the dollar store. I cut out pieces of white felt in the same circumference as the candlestick tops. I hot glued the felt to the bottom center of the bowls and then glued the other side of the felt to the top of each candlestick. I put felt in between because I knew the hot glue wouldn't stick to the plastic long, but it sticks to felt really well.


You can't see the felt when the bowls are filled either.

Fill with your favorite candy! M &Ms are one of my daughter's favorites.


I think they will look so pretty on the table with the tissue paper and tulle flowers I made earlier. Not too bad for about $1 a piece, right?


SOME NOTES: The bowls should not be much larger in diameter than the candlesticks, otherwise they could get knocked over more easily. Try to also keep them the same weight as the candlesticks. The glass of these is very lightweight, so plastic bowls were perfect on top. Basically, don't put a heavy bowl on top of a lightweight base, mkay?

Also, obviously you can't soak these in the sink to wash out, so only put in food that can be wiped out later with a damp cloth.

Oh, and in case you are wondering, to achieve the pink and purple small M & M bowl, I combined two packs of Valentine's M & Ms, one in milk chocolate variety and the other in dark chocolate. I just picked out the red ones. I also bought a back of Valentine's peanut M & Ms and also picked the red out of those.

 Don't ask what happened to all the red M & Ms...:)

I'm linked to:


Sunday, February 12, 2012

Homemade Donuts (from refrigerated biscuits)


I have been seeing homemade donuts from canned biscuits all over the Internet for a while now and decided I finally needed to try them. So, that happened this weekend and I even experimented with different toppings (because who wants just a plate full of all the same donuts?)


Canned Biscuit Donuts

1 can TEXAS STYLE BISCUITS
VEGETABLE OIL
1/2 c SUGAR
1 Tbsp CINNAMON
1 c POWDERED SUGAR
SPRINKLES

STEP 1: Heat about 1 inch of vegetable oil in skillet or dutch oven over med to med high heat.

STEP 2: Cut centers out of each biscuit. I used an old bottle cap. Save the centers to make into donut holes.

STEP 3: Place the biscuits in the oil. BE CAREFUL! Flip as soon as you can see the underside turning golden brown. (This only takes about 30 seconds). Cook other side and transfer to a plate with paper towel on it. Allow to cool a bit before adding any toppings.

I made cinnamon sugar, powdered sugar, and glazed (with sprinkles) varieties.

CINNAMON SUGAR
mix together 1/2 cup sugar and 1 Tbsp cinnamon and roll donuts in the mixture, let cool completely, and roll again.

GLAZE
mix together 1/2 cup powdered sugar and about a tsp of water until combined. Add a little more water if you want at thinner glaze. Roll donuts in the glaze, set on wax paper and top with sprinkles

POWDERED SUGAR
Roll the donuts in powdered sugar, let cool, and then roll again.

NOTE: I made two batches of these. The first was with Grands biscuits (I didn't realize I grabbed the wrong can) and they were still raw in the middle, so make sure to use the Texas style or something similar in size...just not the flaky kind because they will absorb too much oil.

Also, I tried rolling the donuts in melted butter before the sugars as the original recipe suggested and I found it just made a mushy mess. I much preferred rolling the plain donut in the sugars. It stuck better and made for a crispier shell on the outside of the donut.

These were a huge hit with my family. My husband already has lots of ideas for other toppings. I love that they were so cheap to make and we all got to stay in our jammies for breakfast:)

Wanna see another up close picture? Here ya go! 


I'm linked to:


Sunday, February 5, 2012

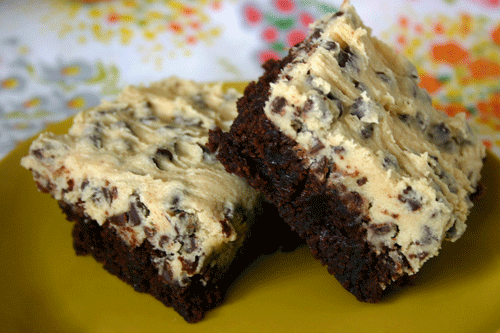
Chocolate Chip Cookie Dough Brownies


Have you been sticking to your New Year's Resolutions? I am very happy to say I have! I have lost a little less than 10 pounds so far and while maintaining a healthier lifestyle, I like to indulge a bit on the weekend when it's my weigh in/cheat day. My daughter and I have fun making a new recipe each weekend and my family doesn't mind tasting our creations either;) We couldn't resist trying out this brownie recipe with an egg free cookie dough on top. My daughter was happy she was allowed to lick the bowl!

Grab the recipe after the jump!

Thursday, January 26, 2012

Chicken and Spinach Pasta Casserole


It was that time of day again. The husband was on his way home. Both kids were crying (we tend to loose it around these parts about 20 minutes before Daddy gets home) and dinner needed to be made.

I had to grocery shop the next day (and we get down to bare bones right before that happens) so I reached for what I had left in my pantry and cupboards...and actually made something edible! Hooray!

Interested in the chicken and spinach pasta casserole recipe? Then read on!

LinkWithin

Related Posts with Thumbnails