Tuesday, July 26, 2011

Embellished Short Sleeve Cardigan from a Long Sleeve Cardigan


I love me a good cardigan. They are so comfy and a great wardrobe staple to add to a dress or a shirt and jeans. I also love that they hide my arms!:)


Maternity clothes have been hard for me to come by lately (seriously, who wants to spend $20 on a pair or shorts that will only be worn for a few months??) and I wanted a new little coat to wear now that it's summer.


I found a long sleeve cardigan at my local thrift store for $1 and decided I could turn it into a more modern looking one with a little flair.


I started by trying on the sweater and seeing where I wanted the sleeves to be (a little below my elbow) and cut off the sleeves at that length. I also cut the ribbed cuff off with a 1/2" extra at the top. I saved the pieces of the sleeve that I cut out to make the embellishments for later.


Next, I flipped the cuff inside out and lined up the seam on the cuff with the seam on the sleeve (with raw edges of cuff and sleeve aligned) and pinned in place.


I took the base attachment off my sewing machine and stretched the cuff and sleeve onto my sewing machine and sewed around the whole cuff with a 1/2" seam allowance.


Here is the new cuff flipped right side out again.


To make it look less like I hacked my own sweater, I put the new sleeve on my machine again (with the sleeve right side out this time) and sewed a 1/4" top stitch above my cuff seam line.


This made the new sleeve look less "puffy" where I had reattached the cuff and made it look more like it came that way originally.


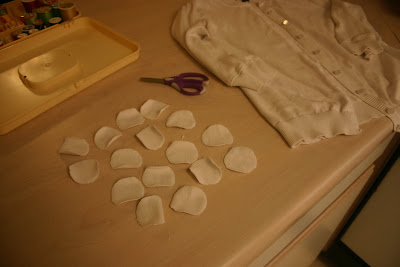
I repeated the process on the other side and when I was done I took my sleeve pieces that I had set aside and cut them into circles (I got 16 circles total from both pieces).


After playing around with a few designs, I noticed the circles just kept folding up into little "tacos" all on their own..so I decided to keep that same form and sew them along the inside of the cardigan. I sewed 8 circle "tacos" on each side.


I started by sewing a straight stitch down the middle of the circles (adding a new circle as I went on the machine) and then to keep them in place a little better, I sewed two additional stitches on either side of my center stitch.


Here is one of the worst pictures of me modeling the cardigan for you:) Oh well, my husband wasn't home to take a picture and we are leaving for CA in a day...so no time to waste people! Note to self: Pregnant bellies don't photograph well from the front...


So that's my $1 cardigan transformation! This process could be done to make the sleeves any length that you want...as long as the cuff will fit the part of your arm that you are adjusting it to:)


OK, I'm off to California for the weekend! And although I won't be going to Disneyland (seriously...I'm SO bummed about that) I can't wait to sit on a beach and do nothing! Well, there will be some sight seeing involved, a visit to the town where I was born, and a Pink's Hot Dog as well:)


If any of you live ( or love) the Anaheim / Los Angeles area and have some fun ideas for what we could do while we are there...PLEASE leave them in the comments section! We aren't super touristy...but we would love to try out some new and exciting things while we are by the coast;)

Sunday, July 24, 2011

Pesto Alfredo Chicken Pasta (under $5)


This week my husband and I agreed that we are only going to eat out once or twice on the weekends only. So that meant making every meal at home all week long. I know...like it's a big deal to eat at home, right? Well, it was actually more challenging than I care to admit...but by Saturday we felt so much better and had sure saved a lot of money!


I pulled out one of my favorite recipes this week: Pesto Alfredo Chicken Pasta. It is SO good and is a great alternative if you are craving pasta from an Italian restaurant.


Ingredients:


1/4 c basil pesto $1.00


2 c whole grain pasta $.50


1/4 c milk $.10


3/4 of a jar of alfredo sauce $1.00


2 c cooked, cubed chicken $2.00


1 c mozzarella cheese $.75


salt, pepper, and parsley flakes (or real minced parsley) to taste


To start off, I poach my chicken. I saw how to do it on Rachel Ray once and I have never cooked my chicken any different ever since. I bring a large pot of water to a slight boil, add a half of an onion (in large chunks) and a bay leaf and boil it for about 20-30 minutes (depending on how many pieces of chicken are in the water). Then when it comes out, it shreds or cuts so easily and is SO moist.


1. Start by boiling your pasta in a large dutch oven.


2. Drain your pasta and leave it set aside in the strainer so you can use the same pot for the rest of the ingredients (I like to use as few dishes as I can).


2. In your pot throw in your chicken, alfredo sauce, pesto, and milk. Keep on medium high heat and bring to a boil for a minute or two to thicken it up. Add salt or pepper to taste.


3. Once the sauce is has thickened a bit, add your cooked pasta and stir all together.


4. In a casserole dish (I use a 13x13) layer in half of your pasta and chicken mixture, half of your mozzarella cheese, the other half of the pasta mixture, and top it all off with the rest of the mozzarella. Sprinkle some parsley on top of you like, cover, and bake at 350 degrees for 20-25 minutes.


Total (4-6 servings): $4.35


http://

Friday, July 22, 2011

Vintage Mickey and Minnie Birthday Party

My daughter's 3rd birthday was back in March and we had a vintage style Mickey and Minnie party for her. I'm going to be honest and confess that I haven't posted these pictures because I wasn't really happy with the way the party turned out. We had the party in February and I was still a mess (read the above "miscarriage" label if you care to know more) and had just gotten over a flu bug that week. Oh yeah..and I was also pregnant again...but I just didn't know it yet! Now I can look back on the pictures and be happy with it because it made my daughter happy. Sometimes we need not be our own worse "mommy critic", right?


For dessert, I made cupcakes for everyone. They are the easy way out and I love them for it:) No cutting cake and hoping there is enough for everyone!


I found the cute blue polka dot wrappers at Michael's and made little paper flowers for the tops (make sure to let everyone know not to eat them!). The ears were thin mint candies and I just used canned chocolate frosting and a large star tip to ice them. I was going to punch out little "buttons" for the front of the Mickey cupcakes...but didn't have time.


I just ordered some pizza for lunch and this was our "dessert" table:


I drew the Mickey and Minnie myself and put out my daughter's favorite sweet treats: licorice, M & M's and Hershey Kisses.


The cake for her to blow out her candles with was just something simple I whipped up. I baked half a cake mix in a bowl and then flipped it over and iced it. The "ears" are two rice cakes (also iced) and pressed into the cake with toothpicks. Then I just added the silk flower for an embellishment.


I made a Mickey tray for the candy but gluing two small black paper plates to one large one creating a Mickey silhouette. I bought the red and silver Hershey kisses after Valentine's day and picked out all the red, yellow, and blue M & M's from regular bags. (BTW: There are a LOT more green and orange ones compared to these colors. A weird fact that I now know...)


Oh, and the "cake stand" was a round cylinder Tupperware container that I covered with some blue and white polka dot material to look like Minnie's skirt.


For decorations I got some coordinating latex balloons, grouped them together, and taped some Mickey and Minnie pictures to the strings.


I used black paper plates, blue polka dot napkins, and red cups for lunch. On the red cups, I cut out white circles (from sticker paper) and made "buttons" for the front to make them look like Mickey's pants.


I also printed out some personalized labels for the water and juice boxes for the kids.


For my daughter's party outfit, I made her a little dress out of the same material that I used on the cake stand and pulled the red bows off the shoes she wore with her Minnie costume.


Lastly, my party favor bags were super simple. They consisted of handmade coloring books (seriously the BEST favor idea I have ever seen that I found at Prudent Baby), crayons, and little boxes of candy. I found the candy at Walmart during Valentine's Day.


For the coloring books I started with these books I found in the $1 section at Target. Let me tell you, I was SO excited to find an all vintage Mickey coloring book right before my daughter's party! It was meant to be:)


I tore out the pages and trimmed the edges (to get rid of the copyright stamps at the bottom).


Then I made a folded flap for the side out of card stock and used a zigzag stitch to sew them together. I didn't take the time to put covers on them...but I actually liked them that way.


For the crayons, I bought a large box of crayons and divided them up into different groups. I made the little bags by sewing together a little pouch made of wax paper. It was just a nice twist on a traditional crayon box. I then put all the items in fun polka dot party bags that I had found on clearance at Target.


So...that was our fantastic vintage Mickey and Minnie party! I'm glad I finally shared it on here. My daughter STILL talks about it...so I know she was happy that day and that's all that matters.


Plus, now she is already planning her Tinkerbell party for next spring...yikes!

Wednesday, July 20, 2011

Antipasto Frech Bread Pizza (under $4)

I've really be ignoring this blog a lot lately, huh? We haven't been up to much. It's about 115 degrees outside and so we have just been staying inside, under the air conditioning that we pay so much for. So my days are spent coloring, playing with Play Dough, reading books, and watching episodes of Shaun the Sheep.


We have also been eating most/all of our meals at home. This is one of my most favorite quick meals (sorry I can't remember where I got it from) that tastes like to took a lot more time to make. It's all about fooling the hubs...:) You could easily double this recipe to feed a larger family. With this portion the three of us were able to eat lunch and my husband had some to take to work as well.


Ingredients:


1/2 loaf of french bread $.50


1/4 c basil pesto $1.00


8 slices of pastrami (or salami) $.69


1 tomato $.25


1/4c of black olives $.20


4 slices of provolone cheese $.80


1. Cut the french loaf in half and spread the insides with the pesto:


2. Layer the pastrami, tomatoes slices, and chopped olives on top.


(You could also add anything else you like such as pepperoni, green peppers, artichoke hearts, or onions.)


3. Lay cheese slices on top (I also put on a little pepper) and bake in the oven for 8-10 minutes at 425 degrees:


Total (4-6 servings): $3.44


This pizza is seriously so good that I think I am going to make the other half of the loaf again for lunch today:) It's quick and simple and doesn't heat up my entire kitchen. Enjoy!

Friday, July 8, 2011

Baby Clothes Quilt: Part 4...Finished!!


My daughter's baby clothes quilt is finally finished! It was a lot more work than I anticipated...but also SO much fun.


Once I got all my squares sewed together and the seams ironed on the back, it was time finish it up.


I took my backing material (a twin sheet) and laid that face up on the floor, then my squares went on top of that (face down) and then finally the batting on top of it all. I used the lowest loft batting by the yard at Joanns.


I pinned all the way around and stitched all the way around as well..leaving a 12" opening so I could turn it right side out.


Once I turned it right side out, I folded in my opening and top stitched around the entire blanket with about a 1/4" seam. I did it this way because I didn't want to put binding on the ends of the blanket.


Now I had a blanket...but it needed to be secured in certain spots to keep the layers from shifting.


Instead of quilting this in the traditional sense (a lot of stitching over the entire blanket)...I opted for a less noticeable way of securing the blanket in even spots. There are some embellishments (buttons, pockets, and bows) on this blanket so I wasn't sure how quilting it all over would work or look in the end and I didn't want to distract from the clothing.


I measured out equal spots to sew and pinned those areas. Basically I pinned the meeting corners of every other square (in every other row). Then, I sewed a small straight line on that seam where the squares met. It was very simple and is not noticeable from the front.


That completed my first baby clothes quilt!


I tried to cut out as much from each piece of clothing that had the most character such as pockets, bows, or buttons.


Here is the back of the quilt. I found this flat sheet at the thrift store and it had polka dots in all colors so I thought it complemented the front of the blanket nicely without distracting from it.


Here you can see my little stitches to keep the blanket from shifting:


I'm SO happy with the way it turned out! I also can't believe I actually finished it! It was one of those things on my crafting "to do" list that I am so happy to cross off. Cutting the clothes up was by far the hardest part (emotionally)...but seeing it all put together into something that can last years and years is so worth it.


I have to admit the first night I finished it, I sat on the couch and cuddled with it:) I know my daughter is only 3 (going on 30), but as she grows older and older I am finding out that they only stay little for a short amount of time. One day I will get to make one for our little guy too:)


Price:


clothes: already had


2 yds lightweight fusible interfacing (for stabilizing knit materials): $2.50


2 yds of low loft batting: $3.99 (with 50% sale)


polka dot backing material (thrifted twin sheet): $1.50


Total: $7.99


But really...this blanket it priceless:)


I'm linked to:


Tatertots and Jello


Sugar and Dots

LinkWithin

Related Posts with Thumbnails