Tuesday, November 30, 2010

Ruffle Tree Skirt from a Fleece Blanket

I have been wanting a new tree skirt for a while. My husband and I got all our Christmas decorations on clearance the month before we got married so that we would have a tree and decorations the following year for our first Christmas. Now, although that was a good idea (we got a 7ft pre lit tree for $25!) it was slim pickings when it came to tree skirts...and for some reason I never got around to replacing it over the last five years!

So, this was the year to upgrade! I wanted something simple to make, but classic and that would last for years to come.

I started with a fleece blanket that I found at Walmart for $3. They also had a lot of other colors to choose from if red isn't your favorite:)

The blanket was 50"x60".

1. First I measured how wide I wanted the skirt to be. I wanted it to be the same width as the bottom of the tree, which was 36".

2. I cut out a 36" square from my blanket.

3. I folded the square in half one direction and then in half the other direction so I had a smaller square. This is so I just had to cut one corner once instead of cutting each corner.

4. I fashioned a ghetto compass by using a piece of yarn and tying it to the end of a marker and then holding the other end to the bottom left corner (center of fold) and marking from the top left corner to the bottom right corner. You want to make the mark on the sides with the raw edges.

(The compass line is the bottom one)

5. I cut on that line.

6. Then I unfolded the circle and trimmed any places that needed to be evened up.

7. Next, I cut a slit halfway up the middle so that I could try it on the tree to make sure it was the right dimensions.

8. Next, I took the remaining long side of the blanket and cut strips that were about 1 and 1/2" wide.

9. I started sewing the strips around the bottom edge, ruffling the strip as I went. One strip was not long enough for the entire edge, so I just added strips as I went along, folding under the beginning of the next strip so it just looked like another ruffle in the same strip.

This is how I ruffle on the machine. I work in about 3" increments, gathering about three ruffles, sewing them down, stopping the machine (with the needle still in the fabric) and then grabbing more of the strip to ruffle.

I just free handed the strip all the way around, but if that worries you, then while your tree skirt circle is smoothed out, draw on lines for your ruffles and use that as a guide as you are sewing.

10. I added another ruffle strip a couple of inches in from the bottom one.

(And yes...that is a pile of clean laundry on my bed)

11. I added a third row of ruffles a couple more inches in and decided to be done there.

Super easy right? I love the weight and feel of the fleece...and that I didn't have to finish any of the edges. That made it a lot quicker to make.

You could do this with any design, not just ruffles. You could use the rest of the blanket to make little layered flowers for the skirt, or any other shapes and designs you want:)

Total Price: $3.00

I'm linked to:

Sew Much Ado

Monday, November 29, 2010

Coffee Filter Tree

I had some coffee filters left over from my Coffee Filter Wreath so I came up with this coffee filter tree for Christmas.

Materials:

1/2 pack of coffee filters

poster board

hot glue gun

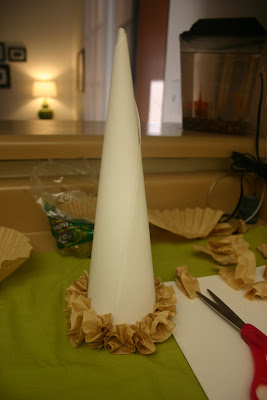
I cut a rectangle out of white poster board (about 1/4th of the whole sheet). Then I rolled and glued it to make a cone.

There was a little tail at the bottom so I cut it flush.

I took a coffee filter and cut it in half.

Then I folded that in half twice and scrunched it a bit so it looked more ruffled.

I cut the bottom off so I could glue it on to the cone.

I started gluing along the bottom.

Worked my way up:

And then glued one last puff on the top.

Finally, it still looked a little plain, so I got a wooden star at the craft store and painted it red. I wanted the star to look more stained than painted, so right after I painted the red on, I just wiped it right off with a paper towel. I glued the back of the star to a toothpick and shoved it in the top.

There are a few more Christmas crafts I have planned...if I can manage to get them done before Christmas:)

Price:

coffee filters: already had

poster board: $.50

star: $.25

Total: $.75

Thursday, November 25, 2010

Muffin Pan Advent Calendar

I hope everyone had a great Thanksgiving! I know I have so many things to be thankful for and it was great spending the day with my closest loved ones and appreciating everything in my life:)

Now that my daughter is two, I wanted a fun advent calendar for the days leading up to Christmas. I have seen a lot of ideas online about using a flat cookie sheet and then using mini magnetic tins for the days and then I also saw this idea of using a mini muffin pan.

I got this 24 count muffin pan at Goodwill for $1.00 a few months ago. It had some markings on it...but I figured it would be covered by paper anyways. You can also find one of these at Walmart or Target for about $10.

I spray painted the front and back of the pan with red paint.

From what I read online, spray paint will not adhere to a Teflon coated pan...so keep that in mind when looking for one.

Next, I found a large 9x12 magnetic sheet at Joann. I cut 2"x2" squares to cover the holes.

Then, I cut out coordinating scrapbook paper in the same size and Mod Podged it onto the magnetic sheet. You can also find adhesive magnetic sheets so you wouldn't have to glue your paper on.

Align Center

Finally, I cut out 1"x1" squares of scrapbook paper and wrote the numbers on. I couldn't find cute number stickers this week and I didn't want to go to another store just for that...ever been there?

I also filled the tins with some peppermint bark bells and thin mints. Also, this week I am going to print out little strips for each cup that will tell the story of Jesus' birth.

I chose to leave my more simple than ones I have seen online...just cause that's more my style, but there are a ton of variations you can do with this. I thought about making more magnetic covers for more holidays like birthdays or our wedding anniversary:)

I can't wait to get out the rest of my Christmas decorations this weekend. We don't have much room to decorate...but that won't stop me from putting up our tree! It's a must:)
Price:
muffin pan: $1.00
magnetic sheet: $1.50
scrapbook paper: $1.00
candy: $2.00
Total: $5.50

Tuesday, November 23, 2010

Ruffle Christmas Stocking

I like to decorate for Christmas on the day after Thanksgiving...so I have been working on Christmas stockings this week to have them ready by Friday.

This ruffle stocking is mine and I can't wait to show you the ones I have planned for the Hubs and Little Miss:)

Materials:

1/2 yd of fabric for stocking/lining

(if your fabric has a pattern...you may need more than a 1/2 yd)

material for ruffles

fusible fleece

stocking template

(I used this one...and blew it up on my computer so the top measured 8")

1. Cut out four pieces of fabric, two for the outside of the stocking and two for the lining.

You want two facing each direction.

(This is the material for my daughter's stocking and that's my template in the middle)

2. Cut out strips for your ruffles that are double the width of the top of your stocking and double the width that you want the finished ruffle to be.

3. With right sides facing, fold your strip in half lengthwise and sew along the raw edges.

4. Flip the strips right side out and iron (with the seam a little off center).

5. Pin the edge of the strip where you want it to be on the front piece of your stocking and sew down the center of the strip, gathering as you go to create a ruffle.

Repeat with other strips.

6. Iron some fusible fleece to the wrong side of your front panel.

7. Place the back panel of your stocking right side down on top of the top ruffle panel, pin, and sew around the edge with a 1/4" seam. Leave the top open.

8. Flip it right side out.

9. Take the lining pieces of your stocking and with right sides facing, sew around the edge with a 1/4" seam.

10. Sew a little loop for your stocking. I took a strip of fabric, folded the long edges into the center and then folded the whole strip in half lengthwise again and sew along the long edge. Then fold the strip in half and sew edges together to make a loop.

11. Now take the lining of the stocking (still turned inside out) and place the outside of your stocking inside (still facing right side out) and pine the raw edges together at the top.

To sew the loop in, place it on the left side seam with the loop part facing down (raw edge aligned with the other raw edges) and pinned between the lining and outer piece.

12. Sew around the top of the stocking, leaving a opening to turn it right side out.

13. Flip right side out through the opening, tuck the lining inside, fold in the opening edges, and sew closed.

I really like it:) It turned out a little smaller than I wanted...but that just means my husband can fill it with jewelry right?:)

I ended up getting all the material and supplies for all three stockings for under $6! Can't beat that right?

Hopefully I will have time to finish another one to share tomorrow:)

I'm linked to:

Sugar and Dots

Sew Much Ado

Double Layer Pumpkin Cheesecake

I make this pumpkin cheesecake every year for Thanksgiving. It is probably one of my favorite holiday desserts. I can pass on most sweets...except cheesecake! I am a sucker for salty sweet things;)

Here is the recipe:

2 pkg (8oz each) cream cheese

1/2 c white sugar

1/2 tsp vanilla extract

2 eggs

1 9in graham cracker pie crust (I made my own with a recipe below)

1/2 c pumpkin puree (NOT pumpkin pie filling)

1/2 tsp cinnamon

1 pinch cloves

1 pinch nutmeg (I left this out because I don't have any)

1. Preheat the oven to 325 degrees.

2. You can use a premade graham cracker crust, but I already had a box of graham cracker crumbs in my pantry so I used those.

Here is the recipe I used:

1 and 1/4 c graham cracker crumbs

3 tbs white sugar

1/3 c butter-melted

Mix graham cracker crumbs and sugar and then mix in butter until crumbly. Press into pie pan and bake for 5 minutes at 325 degrees.

3. Blend cream cheese, sugar, vanilla, and eggs until creamy. Reserve 1 cup and set it aside.

Oh...and save the cream cheese boxes...they make great gift card boxes for Christmas:) Is it weird that my family uses old food boxes for our gifts?

4. Spread the cream cheese mixture (from the bowl) into the pie crust.

I like to keep it about a 1/2 in from the outer edge so the next layer is easier to spread on.

5. Now mix the reserve cup of cream cheese, pumpkin puree, cinnamon, gloves, and nutmeg together.

6. Spread the pumpkin mixture on top of your other cream cheese layer.

7. Bake at 325 degrees for 35-40 minutes or until set.

I wish I could show you the inside (and eat some!)...but I am saving it for Thursday and I am sure my family would appreciate me not eating part of the dessert beforehand:)

What are your favorite Thanksgiving desserts?

Monday, November 22, 2010

Spinach Pastrami Sub on Garlic Parmesan Bread

A friend shared a version of this sub with me a few weeks ago. I tried it...and I knew my husband would love it. We tweaked it a little to fit our taste. This could be made with any bread, cheese, and meat you like!

Ingredients:

1 french loaf of Garlic Parmesan bread (I find it at Walmart)

4 slices of Provolone cheese

1 cup of fresh baby spinach

5 slices pastrami

5 slices turkey

1. Cut the loaf in half and lay inside up on a cookie sheet.

2. On one side layer spinach and then cheese slices on top. On the other layer the meat.

3. Put under the broiler for 3 minutes.

Doesn't it look amazing? I love recipes that are extremely easy, customizable, and taste like I spent more than 5 minutes making it:) It makes for a nice alternative to the constant PB&J lunches in our house.

The best part about this is that it reheats perfectly too. I wrap the leftovers (if there are any!) in tin foil and keep it in the fridge. Then I just pop it in the microwave for 20 seconds and it tastes like the day I made it!

I think I have made one of these once a week for the last month:) My husband has been known to take a whole half loaf to work for his lunch.

Price:

bread loaf: $1.50

pastrami and turkey: $1.20

cheese: $.75 (I use half a pack)

spinach: $.50 (I can get 4 sandwiches out of one $1.99 bag)

Total: $3.95!

That's cheaper than going to Subway...and you got to sneak spinach into your family's diet:)

LinkWithin

Related Posts with Thumbnails