Tuesday, September 27, 2011
Simple Jewelry Organization
Monday, September 26, 2011
DIY Nursing Cover
One of the crafts I wanted to make sure and get done before the baby came was a nursing cover. I didn't nurse my daughter for long when she was born ( it was a nice mixture of a screaming baby that only screamed when I tried to nurse and an overwhelmed new mom!) so I am excited this time to try again but I'm not puting so much pressure on myself this time.
I read a lot of tutorials online on how to make one of these and decided that the tutorial on Prudent Baby was the easiest to understand.
I used this Alexander Henry fabric that I picked up at Goodwill for $1.99...but I didn't know it was a designer print until our trip to California:)
The tutorial was really easy to follow and the only thing I changed about it was adding these towel pockets in the corners. I used the already finished edge of the towel so that I didn't have to refinish it and sewed the raw edges into the nursing cover when I hemed up all the sides. It was a simple addition from a towel I already had!
Price:
material: $1.99
boning: $.50
d-rings: $.50
Total: $2.99
Sunday, September 25, 2011
Easy Striped Crochet Baby Blanket
Friday, September 23, 2011
DIY Baby Mobile
Wednesday, September 21, 2011
Fabric Covered Baby Wipes Case
I've had a string of crafty failures this week which has left me with a "blah" feeling. So I decided I needed a quick project to boost my crafting self confidence. So that's how we get to the fabric covered baby wipes case:
My daughter isn't a baby anymore...but we still have a case of wipes in her bathroom and the downstairs bathroom because they are still just so darn handy! After staring at this Disney princess case for over a year, I just couldn't take it anymore and something needed to change.
There are many tutorials online on how to go about redoing a wipes case and this is how I chose to do it.
I started with my case, some white acrylic paint, and a foam brush.
The material I wanted to use was a little too thin to cover the original image on the case, so I had to paint it white. If you are using a thick material or an already white case...then you can skip this step.
Next, I cut out a strip that was a few inches bigger than the wipes case in both directions. I cut my piece to be 25"x4"...but I recommend cutting yours 25" by at least 6" because I didn't have quite enough for the back.
Now, I brushed a coat of Mod Podge onto the case and started wrapping it with my fabric from the front (starting with the center of my fabric strip).
With more Mod Podge I worked around both sides. The case curved a bit so to avoid bubbles, I just pulled the fabric tight and trimmed the top edge as needed to be flush.
I used hot glue on the bottom of the case for the bottom edge of the fabric. I folded in the corners kind of like wrapping a present.
Here is a view of the back. I applied a little Mod Podge to the seam as well. You can see where I didn't have quite enough fabric at the bottom to accommodate the curve of the box. It doesn't bother me too much though since it will be facing the wall.
At this point you could also apply Mod Podge to the outside of the fabric to seal it, but I liked the fabric texture and decided not to.
Now this can go back on top of the toilet tank in my daughter's bathroom looking a little nicer than the princesses before it:)
Tuesday, September 20, 2011
Easy Applique Shirt
I've shown how to make an applique before when posting about my daughter's Cinderella silhouette shirt . Here is another basic "how to" lesson on making an easy applique...because they are just so much fun:)
I found this two pack of onesies at Walmart a few weeks ago for $1 (yes, $1 for the pair!) and decided they would make really cute appliques on bigger shirts for my daughter. She is in the Mickey Mouse Clubhouse phase right now and loves everything with Mickey and friends on it.
I also used a plain t-shirt I found at the thrift store for $.50 and some super hold Heat N Bond (in the red package).
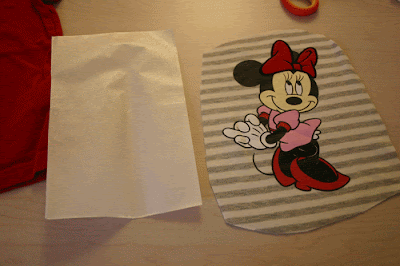
1. Start by cutting out the image you want to turn into the applique. I cut a large circle around it so I can cut in closer later. Also, cut out a piece of Heat N Bond the same size as your fabric.
2. Iron the Heat N Bond to the wrong side of your image per the package instructions.
3. Now go back and cut out the image with more detail, peel off the paper backing to the Heat N Bond, and iron it to the front of your shirt.
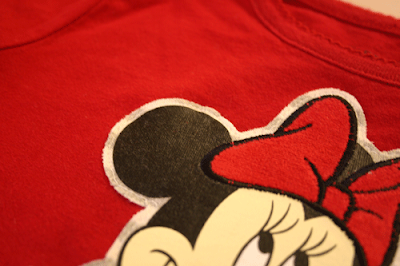
4. The next step is to sew around the edges of your new applique. If you don't do this...the Heat N Bond will eventually peel off your shirt. I like to sew around with just a straight stitch so that the edges curl a bit after washing...but if that's not your style, then sew around with a tight zig zag stitch.
Here is a view of the inside of the shirt:
That's it! Easy, right? Put the new shirt on your little cutie and have them love you forever:) My daughter had to tell everyone at the grocery store that she was wearing her new Minnie Mouse shirt:)
I'm linked to:
Monday, September 19, 2011
Baked Antipasto Tortellini and Giveaway Winner!!
Well, I didn't post at all this week, but I have been busy crafting (among other things). I finished a crocheted blanket for the baby, a hanging mobile for above his crib, got my daughter to her first Awanas class, gave my mom her first lesson on using a computer, managed to make most of our meals at home, had a great time with a friend at the mall, and got wonderful news from my OB that my blood work for intrahepatic cholestasis of pregnancy was negative (it seems I just itch incessantly for no apparent reason). So, all in all it was a good week with great outcomes!
One thing I came across was this new recipe that I like to call Baked Antipasto Tortellini. Basically the family was hungry..and dinner needed to be on the table in about 15 minutes before grumpy attitudes set in:) It was inspired by our favorite Antipasto French Bread Pizza.
So, I went to the fridge and pulled out a bunch of left over things and came up with my husband's new favorite dish:
Ingredients:
1 package of tortellini (any flavor you prefer)
1/2 c Alfredo sauce
1/4 c milk
1/4 c basil pesto
1/4 c chopped black olives
1/2 c chopped ham
1/2 c chopped tomatoes
1/2 c shredded mozzarella cheese
salt and pepper to taste
1. Boil the tortellini per the package instructions. Drain and place back in the saucepan.
2. Mix in all the rest of the ingredients (except mozzarella) and heat for about 5 minutes.
3. Pour pasta mixture into 8x8 cooking dish and top with cheese. Bake at 350 degrees for 10-15 minutes or until cheese is melted.
So easy right? With the fall coming, the cooler temperatures are enticing me to make more baked dishes for dinner. Maybe it's an Italian gene I have or something, but there is nothing better than pulling a hot casserole dish out of the oven filled with pasta and with bubbling cheese on top:)
OH! And before I forget...here is the winner of the Anthro Inspired Necklace Giveaway (through random.org)
Comment #5:
Doublej2 said...
so you have made another craft since the hat! ;) i love the pillow you made saturday. i'll be working on one this week also. i'm definitely a follower!! that necklace is one of the things i always look at on your blog header. thanks for the giveaway!
~jan
Congratulations Jan and thanks for being a follower! Thank you also to everyone who entered and has either been a follower or became one this week:) I truly appreciate the feedback I get from writing this blog. It makes me feel like I'm not just talking to myself...although I do that sometimes too:)
Anthro Inspired Necklace GIVEAWAY!!!
GIVEAWAY ENTRY NOW CLOSED
I am 31 weeks pregnant now and the nesting stage has hit me with full force! I have spent the last week cleaning (and scrubbing) almost every room and closet in our house.
Along with all the cleaning comes getting rid of a lot of things as well. As I was going through my tangled necklace mess (am I the only one who has one of those??)...I found my Anthro Inspired Necklace and decided that I want to share it with one of you!
Here it is to refresh your memory:
So, do you want a chance to win this? If so, become a follower of Honey Scrap and leave me a comment saying that you did so! If you are already a follower (thanks!!) then just also leave a comment saying that you are already a follower:)
Next Sunday (9-18-2011) I will pick a random comment from the comment section as a winner! Thanks, and good luck!
Saturday, September 10, 2011
Scrappy Leaf Pillow
I've had the idea for this pillow for quite some time...I was just never quite sure how I wanted to get it done. This was my original inspiration:
(Sorry I don't have the source for this. I saved the picture a long time ago!...I'm pretty sure it was from Target.)
I decided to use some fabric I already had in my craft closet. The front of the pillow is a muslin texture and I cut out some leaf shapes out of my favorite vintage fabrics. I sewed them on the front and then used some left over material from this crib bedding for the backing. The pillow was assembled by placing my right sides of fabric together and sewing around three sides (side to top to other side...leaving the bottom open). I inserted my pillow form and sewed up the bottom by hand.
It was a fun throw pillow to make, while using up some materials I already had:)
I'm linked to:
Monday, September 5, 2011
Applique Baby Hat
I have been working on a few baby crafts this week, and one was a hat for our little guy. He will be a fall baby and the weather will be getting colder shortly after he is born...so I need to keep his head warm. He can also be stylish at the same time, right?
This is a simple way to change up an existing baby hat. I found this black hat at the thrift store with the tags still attached for $.69. I used some left over material from my bassinet makeover and some heat and bond.
The first thing I did was use my seam ripper to open up the seams where the ears were and remove them.
You can see that there were two holes (where my fingers are poking through).
So, I flipped the hat inside out and sewed up the seam openings with matching thread on my sewing machine:
I flipped the hat right side out again and ironed on my applique. You can learn more here about how to make (and apply) an applique.
After I ironed on my applique, I stitched around it on my sewing machine:
The End:)


