Thursday, January 27, 2011

Moving Is Hard

I saved the sadest box for last...my shoes. I only have tennis shoes to wear for the next two days. Ugh.

Goodbye my loves...I'll see you soon:)

I did finally clean out my kitchen pantry. Only 11 months too late huh? Oh well, it was what I was dreading most (well, second to my craft stash) and I found that I have enough spaghetti sauce and black beans to last a while!)

I'm off to work on our patio! Since when did packing up 800 sq ft become so exhausting? On top of it I have a toddler with a cold and a husband that has been working 13hr days. Fun times!

Fun Embellished Bobby Pins

I found this pack of buttons at Michael's and thought they would make cute bobby pins for my daughter.

The back of the buttons had little holes on them...so I snipped them off with some wire cutters. The buttons were a soft plastic so they didn't break when I did this.

I slipped a small circle of felt in the bobby pin and then glued it to the back of the flower and that was it!

I made 6 new and fun hair accessories in less than 10 minutes. I love crafts like that:)

Total price (for 6 pins): $1.99

Tuesday, January 25, 2011

Scrappy Flower Pin

I have used this flower tutorial from House of Smiths many times for headbands for my daughter. I got the idea tonight to turn it into a pin for my necklaces and bracelets.

1. First, I cut out 6 circles from some fabric. The size of your circles is the same size your flower will end up being.

2. I put a dab of glue in the middle of the circle and folded it in half.

3. I put another dab of glue in the bottom center and folded 1/3 of the half circle in. I flipped the whole thing over and flipped the other 1/3 in and glued it.

4. I did that with all six pieces. Next, I cut out another circle of fabric that was slightly smaller than the flower. I glued all my little "pie" pieces to that circle of fabric. I find it also helps to put a dab of glue between each piece to make it more sturdy and less floppy.

5. I cut out a tiny circle of fabric and glued it into the center and then glued a pearl in the center of that. The pearl is an old earring that I took the post off of.

6. I glued a pin to the back. Then I glued a strip of felt over the inside of the pin.

I also made a black one, which I can't wait to pin to some black elastic bracelets that I have.

I love that they can be interchangeable with whatever necklace or bracelet I am wearing. They can even be worn by themselves or pinned to a hat. I like crafts that can be used in more than one way:)

All I had to buy was the pins. I got a pack of 100 from Michaels for $1.50 after my coupon. The rest of the fabric, pearls, and felt was what I already had on hand.

I'm linked to:

Sugar and Dots

Friday, January 21, 2011

Shower Curtain From A Flat Sheet

Remember this full size flat sheet that I got at Goodwill last weekend? I finally got around to making a shower curtain out of it for my daughter's new bathroom (we move next weekend!!). This was a really easy project that would be great if you are a beginner at sewing.

1. I folded my flat sheet in half lengthwise and folded a shower curtain I already had in half and laid it on top. I lined up both folded sides together.

2. I cut the side with an extra 1" so that I could hem it. I cut the bottom with an extra 2" because the shower curtain I had was a little shorter than I liked...so I wanted to make sure this one went down to the floor.

3. I hemmed the sides and bottom of the flat sheet. I did this by folding in the raw edge 1/4" and ironing flat...then folding in another 1/2" and ironing and then sewing with a straight stitch.

4. I lined up the top of the shower curtain to the top of my flat sheet and marked where the slits were for the curtain rings.

5. I attached the button hole foot to my sewing machine. I picked a 3/4" button to make sure the slit would be big enough for my hook.

6. I sewed a button hole at each mark I had made.

7. Finally, I cut a hole between the stitches and put some fray check on them as well.

I really love the color and pattern. My daughter loves it too. She came in and said, "Oh! You made that for me? Thank you Mommy!".

For now I have some silver hooks holding it up. I may have to brainstorm some cute hooks...but I kind of like the simple hooks with such a busy pattern.

I still have quite a bit left over from my $2.00 sheet. I can't wait to show you my plans for the rest of it:)

I can't wait to have natural light in our bathrooms! I am so excited we are moving...but I still have to pack just about everything:(

I'm linked to:

Tatertots and Jello

Thursday, January 20, 2011

Tomato Sausage Pasta

This is one of the first recipes I made for my husband...that didn't make him gag:) Seriously...I was a terrible cook when we were first married. He told me a few months ago that everything has gotten better with me in time...I still don't know if that is a compliment or not...

So, I thought I would share the recipe that redeemed my cooking reputation:

1 (16oz) package of smoked sausage or kielbasa...I use turkey

1/2 c chopped white onion

2 cans petite diced tomatoes...I use the basil oregano blend

1 can (8oz) tomato sauce

3/4 c water

1 c pasta...I use anything whole grain

1. Brown sausage and onion over med-high heat

2. Add tomatoes, tomato sauce, and water. Bring to a boil.

3. Stir in uncooked pasta. Cover and keep on low for 15 minutes (or until pasta is tender)

Serve!

I have to add water sometimes in the middle of cooking the pasta. I love this dish because everything is in one pot and I don't have to boil the pasta separately. Anything that is easy and makes me look good is awesome:)

Price:

turkey sausage: $1.97

pasta: $1.00

onion: $.50

tomatoes: $.88

tomato sauce: $.30

Total: $4.65

Tuesday, January 18, 2011

Happy January to Me!

I have been wanting a KitchenAid stand mixer for a long time. I mean a really long time. I almost bought a red one on craigslist a few months ago for $80 (minus any extra attachments)...but by the time I called the lady it was gone. I never really pursued it past that because I didn't want to spend the money. I can't really justify $300 sitting on my counter.

So (this is where the story gets exciting!), my aunt gave me my grandma's old stand mixer!! I got it this week and it's beautiful, it's white, it's a KitchenAid, it has ever single attachment known to man (my Italian grandma rocks) and it's mine.

It has a little rusting around the label...but I don't care in the slightest. I love that my grandma owned it and loved it for decades and now I get to use it too.

So, right now it is taking up half of the only counter we have...but I don't care. It weighs a million pounds, but I don't care about that either (the hubs kinda does since he had to bring it up the stairs). I have a manual and a lot of fun attachments to play with so see ya later!

Monday, January 17, 2011

DIY Play Kitchen Part 1: Burners

While my dad is busy adding a large piece of wood to the back of the nightstand I have for my daughter's play kitchen (and making shelves for it)...I decided to get started on the pieces I needed to make.

I liked these burners of a KidKraft kitchen, so they were my inspiration:

I found thin 6" squares of wood at Joann's. I also found a bag of wood circles (21 pieces in different sizes).

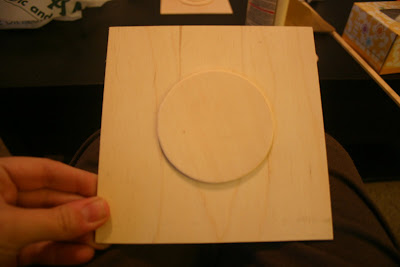
I sanded down the edges of all the pieces and glued (with wood glue) a larger circle in the middle of the square piece:

Then, I glued another smaller circle in the middle of that:

I used square dowels for the burner pieces. I cut them the size I wanted for the corners:

Then, I cut down the inner edge so that they would lay flat over the circle piece:

I cut them with an exacto knife.

I glued on all the corner pieces:

Then I repeated the same process with smaller dowel pieces for the other parts of the burner:

Finally, I painted it all chrome and then the burners were painted black. I didn't paint all the pieces beforehand because I wanted to make sure they glued together well while the wood was still bare.

I can't wait to show you the plans I have for the knobs and the sink! I hope to have it painted by this weekend...but with the packing and such...I'm not sure if that will happen.

Price:

Wood squares: $1.00 (with 50% off coupon)

Wood Circles: $1.50 (with 50% off coupon)

Dowels: $.100

Total: $3.50

Saturday, January 15, 2011

Goodwill Finds

Well, my Goodwill gift card that I got for Christmas came to an end today. It was a sad moment...but I sure did get my use out of it!

Today was Goodwill's 50% off sale and I scored this wooden doll high chair:

For $4.00!!

My daughter is getting a doll from my mom for her 3rd birthday...so this will be our gift to her. I can't wait to pull off those nasty pink bears and give this a new coat of paint. The "tray" piece is a little warped...so I will have to get some scrap wood to rebuild that...but who cares for $4.00?

I also got this vintage flat sheet for $2.00:

I LOVE the pattern. It's so bright and spunky...just like the Little Miss! I am thinking about making a shower curtain for her bathroom...or maybe a twin fitted sheet and pillowcase? I dunno...but I do know it's amazing and I kinda want to just make myself a whole wardrobe out of it.

Oh...and I rounded out my purchase with some Gap shoes for my daughter...for $1.50! It was a good Saturday morning.

Oh...and I drew out my plans for my daughter's kitchen and gave them to my dad today. Having a dad who is incredible at making furniture is awesome. It's like a super hero power or something. I also went to the store and got the spray paint. I can't wait to show it off when we it's done!

Tuesday, January 11, 2011

Ruffle Fleece Pillow

So, I have learned recently that I might be addicted to fleece ruffles. They are so easy and comfy...I love them!

I made two throw pillows for the couch last night (I know...it was exhausting) and this was my smaller accent one. I found this mustard yellow fleece remnant at Joann's for $1...so how could I not buy it?

Materials:

fleece (I think my remnant was 1/2 yard for a 14" pillow)

matching thread

1. Cut out your panel pieces for your pillow 1/2" bigger than you want the finished size to be. My pieces were 14 and 1/2".

(Sorry for the upcoming photos. I live in a cave...plus I always craft at night...plus our apartment is 800 sq ft...it's a terrible combination!)

2. For your ruffle strips, cut strips the width you want (mine were 2") and double the length of the pillow (mine were about 30").

3. Mark the middle of panel piece and pin that mark at the top and bottom (this helps keep the ruffle straight as you sew).

4. Ruffle the strip down the middle of the panel.

(You can see how I ruffle on the machine HERE.)

Also, sew the ends of the ruffle strip down to make it easier to sew to the back panel later.

5. Repeat with the other two strips on either side of your middle strip.

6. With right sides of your front and back panel facing, sew around the edge with a 1/2" seam...leaving an opening to flip it right side out..

7. Stuff and sew the opening closed.

Pretty easy right? I love material that doesn't need the edges finished...makes my lazy approach to sewing just that much easier!

This pillow cost me $1.00 since I already had the thread and the stuffing was from an old pillow of my couch. I can't wait to show you my other pillows soon!

I'm linked to:

Sew Much Ado

Sugar and Dots

Tatertots and Jello

Saturday, January 8, 2011

Baby Clothes Quilt: Part 2

I haven't been crafting much this week...just a lot of non-packing for our upcoming move! I realized I have two more weekends to pack...and I got nothing done so far. Just four empty boxes on my patio...

What I have been doing is a lot of time wasting in Photoshop, planning out my daughter's baby clothes quilt.

This is the design I came up with:

I tried to code each design so I could lay it out easily on the floor to see how it will really look.

I have to say this is a big reason I have been putting off her quilt...and why I don't make quilts at all. I don't care for the designing part. I went through so many different options and designs before I settled on this one. I ended up wanting the colors to blend into each other as opposed to being random.

OK...now I have to lay it all out on the floor and make sure my crappy Photoshop version looks as good in real life. Then I can iron interfacing onto all the squares and maybe start actually sewing it together in February? Seriously...why am I doing this? Oh yeah...memories and stuff.

Wish me luck!

Friday, January 7, 2011

Easy Mongolian Pork

This is one of my "go to" recipes when the hubs and I want Chinese food...but don't want to spend the money (or the calories) on a restaurant...or more commonly...when we don't want to pack a change of clothes and a potty seat for a toddler...

SO...I start with a Mongolian beef seasoning mix and a stir fry vegetable mix from the frozen section. I like this deluxe one from Walmart. It is by far the best one we have had. It has real huge chunks of vegetables.

I've mentioned before how I don't like to use seasoning packets often because they aren't the healthiest. In this case...I make the exception since I don't make it often. You could even just mix the beef and vegetables without the sauce mix and come up with your own healthier alternative:)

You could make this with thin steak...but my husband and I love it with thin boneless pork chops.

First, I cut the pork chops (I use three) in bite size strips and brown them in a dutch oven.

Next, I add the frozen vegetables. I don't thaw them first...I just throw them in frozen with about a 1/4c of water and put the lid on until they are tender. I add water as I need it.

Finally, I mix up the seasoning packet and stir it into the pork and veggies.

You could eat this as is...but we like it over brown rice.

I love this meal. Its so crazy cheap and easy...but it tastes so close to restaurant quality. Definitely a must have recipe for a date night indoors.

Price:

boneless pork chops: $2.50

frozen vegetables: $1.80

stir fry mix: $.70

Total: $5.00

Thursday, January 6, 2011

My Daughter's Room

I thought I would share some more fun things I have planned for my daughter's room. I am looking forward to redoing it a bit when we move. Her nursery was just a two tone color scheme...and I'm over it. It was sweet for a baby's room...but now that she has developed her own little spunky personality...she needs a room that goes with it.
I found these plastic plates at Goodwill and the cups at a vintage shop. I thought they would be so cute for her pretend kitchen. I don't care for the little plates she has now..they are smaller than the play food she has! I love the colors of these...and kind of want some in my size...

Next, I found these canisters on sale at Goodwill for $.35 each! I was going to keep them for my pantry...but I think they would be so cute in my daughter's new play kitchen (more about that later).

I got this little greeting card at a vintage shop for $.10. I know I don't show pictures of my daughter on here...but this looks a lot like her:) Messy hair...and all the things she loves. Music, birds, her blankie, books, and dogs. I plan on framing this for her shelf.

Again, I was at Goodwill (I got a gift card there for Christmas) and I saw these old records for $.50 each!!

I love them and so did my daughter when we spotted them. I will either hang these on the wall or put them on her shelf. The Mickey one is from 1972 and the Cinderella is from 1963. The Cinderella record has some drawing and doodling on it...but I kind of thinks that ads to the character. I can't wait to take them over to my parents house and play them for my daughter.

Finally, I sent my dad the plans I have for my daughter's new play kitchen (she is too rough with her plastic one and is always pulling it down on herself).

I will be using this old night stand that I scored off Craigslist for $5:

And it will end up being one of these two colors:

It will be fun adding a few new things to my daughter's room. I'm having a lot of fun with her showing me what she likes and doesn't like. Every time I ask her opinion...she looks between the choices saying, "Ummmm....ummmm...." with a smile on her face before she picks one:)

What are some of your favorite things or ideas you have for a kid's room?

LinkWithin

Related Posts with Thumbnails