Sunday, July 29, 2012

Happy Sunday

We have had one crazy busy summer! I am loving seeing friends, but also learning to slow down and take more family days. Our weather has been amazing and watching everyone have babies and get ready for weddings has been so fun! (Seriously, I think wedding dress shopping was more fun with my friend this week than when I did it 7 years ago!)

Here is a little bit of my week:

New shoes:


Heart shaped donuts make any morning brighter:


Finding Buzz Lightyear in my bathroom at the end of the day:


Beautiful weather:


Sewing projects:


A crawler developed this week...keeping me VERY busy!:


Making a new bag:


Going downtown:


Pie crust cookies:


Marhsmallow pops for a get together (which my daughter dropped in the parking lot):


Altering some thrift store finds:


Fried ravioli:


Ending a busy day with warm blondies and watching the Olympics with my man.


I have taken almost 200 photos with Instagram in the last two months that we have had our new phones! I love capturing all these little moments. I really feel like these days are so special while the kids are little and things are simple. I want to remember them always.

Happy Sunday!


Friday, July 27, 2012

Mickey Mouse Pie Crust Cookies


I found this little Mickey Mouse cookie cutter on eBay a while back and I love it! I had a pie crust in the refrigerator that needed to be used up, so in 10 minutes flat we were enjoying some cookies!


PIE CRUST COOKIES

roll out pie crust

parchment paper or aluminum foil

STEP 1: Roll out pie crust onto cookie sheet lined with parchment paper. Spread a mixture of cinnamon and sugar over the top.

STEP 2: Cut out shapes with cookie cutters, peel away excess crust, and bake at 350 degrees for 8-10 minutes.


I will definitely be making these for our next trip to Disneyland! Such a fun and easy treat;)

Happy Friday!

Wednesday, July 25, 2012

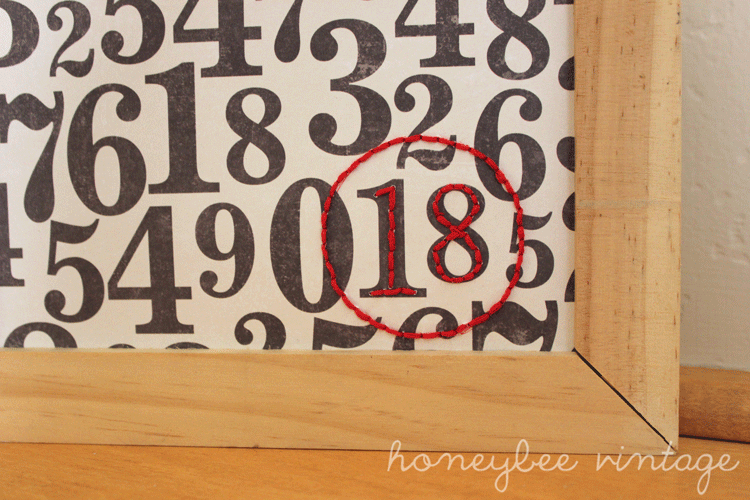
Simple Stitched Number Art


I wanted some fun number art for Jack's side of the room. I found this scrapbooking paper at Michael's and decided to stitch with embroidery floss around the day that Jack was born, which was the 18th.


I like it adds some personality to his side of the room. I'm thinking of making another version for our living room as well.

Happy Wednesday!

Monday, July 23, 2012

DIY: Paper Heart Wall Art


This wall art idea came to me a few days ago and I was so excited to make it for my little girl. She LOVES hearts, and I picked out a bunch of her favorite colors (because, if you are the parent of a toddler, you know how their favorite color changes every day).

Best part of all, this cost $2 to make. We already had some of this wood in the garage, leftover from making slats for our bed, and I also had the lace to cover the front. I bought some scrapbook paper while on sale at Michael's.

STEP 1: I made a heart template out of posterboard and then traced and cut out all my hearts (88 total).

STEP 2: I divided the hearts into 8 secitons of 11 and staggered the colors so they would look random.

STEP 3: I sewed each strand together, leaving a 1" gap between each heart and long threads at the top of each row to wrap around the wood.

STEP 4: I wrapped each line around the wood and secured the string on the top and back with tape.

STEP 5: I cut some lace and hot glued it over the front of the wood, making sure to seal each string.


I'm really happy with how it turned out and my daughter loves it...so that makes me even happier.
It's colorful and sweet, just like her.


I'm linked to:


Saturday, July 21, 2012

The Petal Cake


I have been seeing petals cakes all over blogland lately and I love them. Frosting was on clearance for $.17 a can at Target this week...so all the more reason to give this a try!

To create this, just pipe large dots onto cake and use a flat angled spatula to press down and out. For the bottom row, I used a baby spoon since my spatula was too large.

For better instructions on this technique, check out this video over at The Hungry Housewife. She gives great step by step instructions.

Also, for the frosting, I comined two cans of pink lemonade canned frosting with 2 cups of powdered sugar with a hand mixer. This creates a stiffer texture that will hold a design.

(If you don't need that much frosting, the ratio is 1 cup of powdered sugar for every can of frosting)


Happy Saturday!


I'm linked to:

The Southern Institute

Tatertots and Jello

Wednesday, July 18, 2012

DIY: Fabric Scrap Map


When I saw this map idea...I knew I had to make my own version. I made this map before Jack was born and finally got around to framing it. I used an Ikea frame that I found at Goodwill, and matted it with posterboard.

FABRIC SCRAP MAP
1 large piece of fabric (mine was 20x27)
Scrap fabric
United States template (I found a blank map on Google and blew it up to print it out)
Heat N' Bond
Iron
STEP 1: Print out map and cut out each state.
STEP 2: Iron fabric scraps onto one side of Heat N' Bond per the package instructions.
STEP 3: Trace each state's template onto paper side of Heat N' Bond fabric scraps.
(REMEMBER: When tracing the states, the image will be mirrored once you iron it on...so make sure to trace each state backwards, so that it will face the right way once ironed together)
STEP 4: Iron on each state to your large piece of fabric in order, starting with California first, and working your way east.
OPTIONAL: You can also stitch down the edges of each state. I chose not to since my map was on the smaller size. I also framed it under plastic, so I'm not worried about it falling apart over time.

I'm so excited to have this project done. Within the first 5 minutes of putting it up, my daughter was asking the names of every state (while also telling me what other projects I have made with the same fabric.)


Have a lovely Wednesday!

I'm linked to:

Tatertots and Jello


The Southern Institute

Monday, July 16, 2012

Soft and Chewy Chocolate Chip Cookies


I made these cookies for our friends that just had a baby. They are so yummy and exactly what a chocolate chip cookie should taste like. Crispy shell on the outside, but soft and chewy on the inside.

CHOCOLATE CHIP COOKIES
(from Allrecipes)
1 cup BUTTER, softened
1 cup WHITE SUGAR
1 cup packed BROWN SUGAR
2 EGGS
 2 teaspoons VANILLA
3 cups ALL-PURPOSE FLOUR
1 teaspoon BAKING SODA
2 teaspoons HOT WATER
1/2 teaspoon SALT
2 cups SEMI SWEET CHOCOLATE CHIPS


STEP 1: Preheat oven to 350 degrees.

STEP 2: Cream together the butter, white sugar, and brown sugar until smooth. Beat in the eggs one at a time, then stir in the vanilla. Dissolve baking soda in hot water. Add to batter along with salt. Stir in flour, chocolate chips, and nuts. Drop by large spoonfuls onto ungreased pans. ( I used my cookie scoop)

STEP 3: Bake for 8 to 10 minutes, or until edges are nicely browned.

Let cool for a minute on baking sheet, then move to cooling racks while still warm.

I have made these twice, and I prefer doubling the salt to 1 tsp for a better chocolate taste.

Enjoy!

LinkWithin

Related Posts with Thumbnails