Wednesday, February 29, 2012

Rapunzel Party: The Goody Bags


For the goody bags at my daughter's birthday party this weekend, I wanted to keep them fun and simple.

I found these treat bags with gold designs at the dollar store and they felt very "Rapunzel-ish" and inside of each is the following:

-Mini Rapunzel coloring book
(you can get the tutorial HERE)

-Pascal party blower
(idea and tutorial found HERE)

-play tattoos

-Rapunzel bag with pink Hershey kisses and pink Starbursts
(because my daughter's name starts with an "S")


For the mini coloring books, I printed off Rapunzel coloring pages (getting 4 images to each piece of computer paper), cut them out, and then put them between a folded piece of cardstock. Then, sew down the folded side to bind the book together. I put 8 coloring pages in each book.

The Rapunzel picture of the front of the book is from a box of valentines I found at the dollar store. I stitched it onto the front with my sewing machine.

The Rapunzel sandwich bags (for the candies) were also from the dollar store and the tattoos came in the same box as the valentines.

Each bag got tied with a "braid" that I made out of yellow yarn.


Happy Wednesday!

I'm linked to:

Tuesday, February 28, 2012

Rapunzel Party: Sun Bunting

It's birthday week here in our house! Wa-hoo! My daughter is getting SO excited for her party this weekend...and to be honest...so am I!


If you have seen Disney's Rapunzel (about 500 times like we have!) then you know there is a sun theme in the movie. I saw ideas like this online that were done with paper. When I got to the craft store, felt was cheaper than paper...so felt it was!


SUN BUNTING

1/4 yd PURPLE FELT

5 small sheets GOLD FELT (9x13 size)

1/4" GOLD RIBBON

HOT GLUE GUN

MARKER and PAPER

(NOTE: You can find felt by the yard in the fabric section and felt sheets in the craft section of Joanns)

STEP 1: Cut purple felt into triangle shapes (I made mine more curved at the points).

STEP 2: Print out sun image onto paper to make a template (I Google imaged "Rapunzel sun"). Trace onto gold felt and cut out. I also cut out the centers and trimmed down the circles.
 (I got 4 suns per small sheet of felt.)

STEP 3: Hot glue suns and centers onto purple flags. Also, hot glue a long piece of ribbon to the top edge of each flag to join them. You can make the bunting as long as you want.


I ended up getting 18 flags and 3 rows of bunting out of my materials.

PRICE:
purple felt   $.75
gold felt sheets   $1.25
ribbon   $.20
TOTAL: $2.40

I'm linked to:


Sunday, February 26, 2012

Happy Sunday


Are you having a nice Sunday before the week begins again? I'm happy to say we are.

All pink eyes are now healed.

Baby boy is not nearly as angry about his new teeth coming in.
(he has two little white lines on his bottom gum now!)

The mild case of food poisoning I got Friday night is finally gone.

Baby girl got moved out of her beloved crib and into a twin bed.

Our taxes are (finally!) done.

Most of all, I got to spend two whole days with the people I love most.

It was a great weekend.

Thursday, February 23, 2012

DIY Clock from Saucepan Lid


This is probably one of the most random projects I've done...and one of my favorite!

I saw this saucepan lid at Goodwill and fell in love with the pattern. There was no matching saucepan to go with it, but I decided I still needed to bring it home for just $1.

That's when I got the idea to turn it into a clock!

DIY CLOCK (from a saucepan lid)

STEP 1: Remove knob from saucepan.


STEP 2: Remove motor and parts from clock.
(At this point, I reassembled the clock pieces again and tested them with a battery to make sure taking them apart didn't break them.)


STEP 3: Assemble clock pieces through the hole on the saucepan lid where the knob used to be. Glue the motor to the back of the pan if needed. I also cut out some numbers from the original clock to Mod Podge on the front.


Have a great Thursday!

I'm linked to:

Wednesday, February 22, 2012

What the What?!

Ever have one of THOSE weeks? It starts out like any other Monday...and then by Wednesday morning you are just ready to write off the rest of the week, get to your weigh in/cheat day on Saturday (only to probably find you didn't loose any weight after stress eating all week) so you can finally eat something that used to have a face and enjoy the weekend with your husband (who is gone all week on 12+ hour shifts)??

Nope?

Just me?

Well, that's how this week has gone. Monday it started with this:


For those of you with a trained eye...that is indeed exploded frozen soda. Yup. My husband did leave a wonderful  note about how sorry he was though and that he would clean it up.
 You know, when he got home in 12 more hours.
(PS-As soon as I saw this mess...I downed the last of the chocolate chips in that bag. Mature.)

Then it continued with letting my daughter climb into bed with baby boy and me...only to discover she had a  wicked case of pink eye.

Yup.

After I waited for the triage nurse at the doctor's office to call back, I was told to get eye drops and wash everything she has touched in warm soapy water. So into the washer went all our clothes, bed sheets, and towels.

Finally I got the eye drops for my daughter...and then had to put them in.

As in, had to put them in her EYEBALLS.

Ever tried to pin down a 3 year old and put something in their EYEBALL? It's like wrestling a rabid wild animal....every 4 hours.

Luckily she was only contagious for the first 24 hours after treatment (see above part about putting drops in her eyeballs) and then I was to rewash everything...again.

All this was on top of attempting to get our taxes done and realizing we never got a sales contract on the car we bought back in December. So, 4 unanswered messages to the dealership later..I still have no contract.

The real kicker? Baby boy is teething. Drooling, crying as soon as anything touches his mouth, won't sleep for more than 20 minutes and wakes up screaming like a banshee kind of teething.

He does love his TV though:


He's got a new trick where no matter where we lay him on the floor, he cranks his body around to watch the tube. True man.

SO, that's our week...and it's only Wednesday. How's your week going so far?

Creating Silhouettes (part two)

 I thought I would share a project that I did a while ago. Back when this blog was pretty new, I posted about creating silhouettes without the need of fancy software, or paying a company to make them for you.

Recently I made some silhouettes of the babes to put in our living room. I kinda love them a lot.


Eventhough I already posted how to do this...I will give another quick lesson!

CREATING A SILHOUETTE

STEP 1: Take a profile picture of your subject. Against a plain wall is best but not necessary. For the baby, (since he can't hold his head up yet) I had my husband hold him up against his shoulder so I could snap a quick picture.

STEP 2: Download the picture to your computer and enlarge to the size you want. Holding up a piece of white computer paper (or something similarly transparent) trace the outline of their profile. Cut out and now you have a template.

STEP 3: Use your template to trace onto another piece of paper or fabric, whatever your choice is for the finished silhouette.

I got the frames at the thrift store, painted them black, and then mounted the silhouettes onto white cardstock.


Monday, February 20, 2012

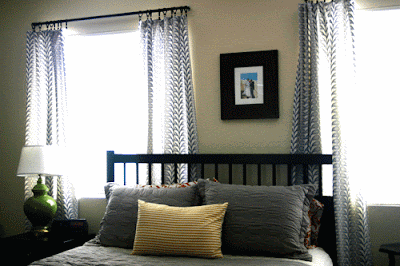
Curtains From a Duvet Part 2 (this time with a lining)


One of my most popular posts to date is the no sew curtains from a duvet that I made for our living room and dining room. It amazes me how many visits it gets each week.

I found another Ikea duvet at the thrift store and knew it would be perfect for the two windows in our bedroom. This time I wanted to line them with another fabric on the back to keep out more light. Baby  boy still shares our room with us (before he can share a room with his big sis) and so, the less light in there during the day...the more likely he is to stay asleep during naptime:)

LINED CURTAINS FROM A DUVET

1 queen size DUVET
2 queen size FLAT SHEETS
MATCHING THREAD

STEP 1: Cut two layers of duvet apart. Then cut each large panel into two curtain panels (You will now have 4 panels). Cut the panels to the length that you need for your windows plus 2" for seams. Cut your flat sheets to the same size as your printed panels.

STEP 2: With right sides facing, sew one duvet panel to one sheet panel (with a 1/2" seam), leaving a gap at the bottom to flip right side out.

STEP 3: Flip right side out, fold in the gap, and top stitch all the way around the panel 1/4" from the edge. Clip to some curtain clips and you're done!


I'm linked to:

Saturday, February 18, 2012

Pie Crust Cookies


I saw a recipe for these pie crust cookies this weekend and just happened to have a package of roll out pie crusts in my fridge...what are the odds, right?

These are super simple and are SO yummy! Major props to the hubs and me for saving a few for my to photograph for the blog the next day.

PIE CRUST COOKIES

Package of REFRIGERATED PIE CRUSTS (or leftover homemade crusts)
2 Tbs MELTED BUTTER
1/4 cup SUGAR
2 Tbsp CINNAMON
COOKIE CUTTERS
PARCHMENT PAPER (optional)

STEP 1: Roll out pie crust onto cookie sheet lined with parchment paper {the original recipe says to roll out on floured counter surface...but I didn't want to clean that up:)}

STEP 2: Spread melted butter onto pie crust with paper towel. Mix together sugar and cinnamon and sprinkle evenly over buttered pie crust.

STEP 3: Use cookie cutters to cut out cookie shapes. Peel off excess.


STEP 4: Bake at 400 degrees for about 7-8 minutes or until just slightly browned. Dust with powdered sugar if you like!

I couldn't resist cutting out mini hearts! I die with cuteness!


Try not to eat the whole plateful in one sitting. I dare you...:)


I'm linked to:


Thursday, February 16, 2012

Make Fabric Picture Mattings with Freezer Paper


We renewed the lease on our condo a few weeks ago so I thought it might be about time to finally finish decorating our bedroom. It's never officially been completed in our entire marriage..let's just say my husband is a very patient man. Maybe you other renters can relate? It's hard to put a lot of time (let alone money) into a place that you might leave in year, am I right?

I found these square frames at the dollar store and decided that they would be perfect for above our large dresser. Normally I don't do the whole "symmetrical decorating" thing...but I thought it might be a good combination with some vintage fabric flair.

I double matted the frames, using posterboard below and fabric mattings above.

Here is how I created them:

STEP 1: Iron a piece of freezer paper (shiny side down) to the back of your fabric in the same size that you need your matting to be. Make a matting template out of posterboard and trace it onto the paper side of the freezer paper.


STEP 2: Cut out the fabric/freezer paper matting and place it in your frame! Mine here is over the plain white matting below since I like the layered look.


You could try and peel the freezer paper off the back of the fabric before placing it in your frame, but I thought leaving it on might add some more stability and keep the edges from fraying.

The best part was I didn't need to purchase any fabric since I already had what I needed. All that was spent was $8 for the frames. Boo-ya!


I think the most fun will be going through our old photos tonight and picking out which ones we want to frame.

Happy Thursday!

I'm linked to:


Wednesday, February 15, 2012

Candlestick Serving Stands


Since we are just having dessert at my daughter's birthday party, I have been thinking up ways to display all the sweets without just putting them in plain bowls. I came across these two glass candlesticks at Goodwill. I don't normally gravitate towards things like these, but I thought they looked so beautiful and elegant...perfect for a princess party, right?

I bought a set of two clear plastic bowls from the dollar store. I cut out pieces of white felt in the same circumference as the candlestick tops. I hot glued the felt to the bottom center of the bowls and then glued the other side of the felt to the top of each candlestick. I put felt in between because I knew the hot glue wouldn't stick to the plastic long, but it sticks to felt really well.


You can't see the felt when the bowls are filled either.

Fill with your favorite candy! M &Ms are one of my daughter's favorites.


I think they will look so pretty on the table with the tissue paper and tulle flowers I made earlier. Not too bad for about $1 a piece, right?


SOME NOTES: The bowls should not be much larger in diameter than the candlesticks, otherwise they could get knocked over more easily. Try to also keep them the same weight as the candlesticks. The glass of these is very lightweight, so plastic bowls were perfect on top. Basically, don't put a heavy bowl on top of a lightweight base, mkay?

Also, obviously you can't soak these in the sink to wash out, so only put in food that can be wiped out later with a damp cloth.

Oh, and in case you are wondering, to achieve the pink and purple small M & M bowl, I combined two packs of Valentine's M & Ms, one in milk chocolate variety and the other in dark chocolate. I just picked out the red ones. I also bought a back of Valentine's peanut M & Ms and also picked the red out of those.

 Don't ask what happened to all the red M & Ms...:)

I'm linked to:


Tuesday, February 14, 2012

Heart Shaped Ponytail


My friend posted this hairstyle she did for her daughter today on Facebook and once my daughter saw it, she wanted to be just like her friend! I followed this video and in no time flat she had two heart shaped ponytails:)

I also clipped the bottoms down because her hair is pretty fine and it wasn't holding it's shape.

Happy Valentine's Day!

I'm linked to:


Sunday, February 12, 2012

Homemade Donuts (from refrigerated biscuits)


I have been seeing homemade donuts from canned biscuits all over the Internet for a while now and decided I finally needed to try them. So, that happened this weekend and I even experimented with different toppings (because who wants just a plate full of all the same donuts?)


Canned Biscuit Donuts

1 can TEXAS STYLE BISCUITS
VEGETABLE OIL
1/2 c SUGAR
1 Tbsp CINNAMON
1 c POWDERED SUGAR
SPRINKLES

STEP 1: Heat about 1 inch of vegetable oil in skillet or dutch oven over med to med high heat.

STEP 2: Cut centers out of each biscuit. I used an old bottle cap. Save the centers to make into donut holes.

STEP 3: Place the biscuits in the oil. BE CAREFUL! Flip as soon as you can see the underside turning golden brown. (This only takes about 30 seconds). Cook other side and transfer to a plate with paper towel on it. Allow to cool a bit before adding any toppings.

I made cinnamon sugar, powdered sugar, and glazed (with sprinkles) varieties.

CINNAMON SUGAR
mix together 1/2 cup sugar and 1 Tbsp cinnamon and roll donuts in the mixture, let cool completely, and roll again.

GLAZE
mix together 1/2 cup powdered sugar and about a tsp of water until combined. Add a little more water if you want at thinner glaze. Roll donuts in the glaze, set on wax paper and top with sprinkles

POWDERED SUGAR
Roll the donuts in powdered sugar, let cool, and then roll again.

NOTE: I made two batches of these. The first was with Grands biscuits (I didn't realize I grabbed the wrong can) and they were still raw in the middle, so make sure to use the Texas style or something similar in size...just not the flaky kind because they will absorb too much oil.

Also, I tried rolling the donuts in melted butter before the sugars as the original recipe suggested and I found it just made a mushy mess. I much preferred rolling the plain donut in the sugars. It stuck better and made for a crispier shell on the outside of the donut.

These were a huge hit with my family. My husband already has lots of ideas for other toppings. I love that they were so cheap to make and we all got to stay in our jammies for breakfast:)

Wanna see another up close picture? Here ya go! 


I'm linked to:


Saturday, February 11, 2012

Vintage Finds (February Edition)

My husband and I came up with a system a while ago where we both get a monthly "allowance". This is just a set amount of money that each of us get to spend however we want. It keeps my husband from raising his eyebrows when he sees a Goodwill bag and I have to keep my mouth shut when he comes home with beer and more parts for his RC truck. It's a great system:)

Anyways, my monthly allowance normally gets given to a thrift store of some kind. So I thought I would share with you what I have found lately that I love!

The cutest shoes for my daughter. I would love these in my size.


Milk/juice glasses for breakfast.


I actually found 4 of these guys and I plan on giving them to my mom for Mother's Day. I have the same glasses and she loved them..so I hope she enjoys having her own set;)


I'm not a tea drinker...but I couldn't resist this teapot. It sits nicely in my kitchen.


My mom actually spotted this large bowl at rummage sale. It is now serving as a fruit bowl on the kitchen table.


I really can't resist vintage wrapping paper. It is my weakness for sure. All these lovelies were $.10 each! I loved the little brunette girl on the right so much, I had to make her my twitter background.


Vintage sheets. Love. The two on the bottom are twin sheets for my daughter's bed and the top two are pillowcases.


I think this bag is my favorite find yet. It is the prettiest grapefruit pink color and works perfectly as a diaper bag.


So, this last item isn't vintage...but I love it anyways. I have been wanting a mustard colored purse for so long and it's perfect for days when I need a bigger bag for the kids.


So, those are my recent finds...how about you? Do you like to thrift? I'd love to see what you have discovered!

I'm linked to:

Wednesday, February 8, 2012

Do You Run?

I have a quick question for today: Do you run?

You see, I am kinda, sorta, toying around with the idea of participating in a half marathon this year. Today was my first run and while I didn't LOVE every minute of it, I was proud that I completed it all while not throwing up. I have high expectations, eh?

Anyways, have any of you every participated in a half marathon? Did you enjoy it? Does the running get easier?

I would love to hear from you...

Sunday, February 5, 2012

Chocolate Chip Cookie Dough Brownies


Have you been sticking to your New Year's Resolutions? I am very happy to say I have! I have lost a little less than 10 pounds so far and while maintaining a healthier lifestyle, I like to indulge a bit on the weekend when it's my weigh in/cheat day. My daughter and I have fun making a new recipe each weekend and my family doesn't mind tasting our creations either;) We couldn't resist trying out this brownie recipe with an egg free cookie dough on top. My daughter was happy she was allowed to lick the bowl!

Grab the recipe after the jump!

Friday, February 3, 2012

Tissue Paper Flowers with Tulle


Planning for my daughter's birthday party is well under way. First I saw these flowers from The Craftinomicon and loved how simple and delicate they looked. Then once I saw these flowers from Greedy For Colour, I knew I had to combine the two into simple sweet decorations for her party.


STEP 1: I cut out 4" squares of tissue paper (all these colors came in one pack from the dollar store...score!). Then I cut out three pieces of matching tulle that were about 3" square.

STEP 2: I folded all the layers accordion style, making sure the tulle side was facing in at both ends. Then I took a green pipe cleaner and twisted it around the middle of the paper.

STEP 3:  I rounded both edges with scissors and pulled each layer towards the center, starting with the tulle first.

I put the flowers into some vintage vases that I had on display in my living room and that was it! Easy table centerpieces that look ever so lovely;)


I'm linked to:


LinkWithin

Related Posts with Thumbnails